The Basics of Celestial Navigation, Part 5: Finding the Second Star on the Right
Before the sextant comes out: picking the right star, and working out where in the sky to look for it.

- Introduction: why we want a backup to GPS
- Part 1: The math that makes the world go round
- Part 2: Turning sunshine into math (working a Sun sight)
- Part 3: Connecting the dots (plotting a running fix)
- Part 4: High noon, low math (latitude by noon sight)
- Part 5: Finding the second star on the right (identifying stars and planets) (you are here)
- Part 6: The Sun clocked out, but the math didn’t (working star and planet sights)
- Part 7: Three lines walk into a bar (plotting a three-body fix)
So far, we have worked with the Sun. Finding it usually isn't the difficult part. With stars, we have another job to do before we put the sextant to our eye: make sure we know which one we are looking at.
We don't need to memorize the entire sky. We need to identify a few useful stars, know roughly where to find them, and get their names right when we record the sights. The arithmetic can be perfectly good and still produce a useless answer if we start with the wrong star.
The short window between too bright and too dark
For a normal sea-horizon star sight, we need to see both the star and the horizon. That makes twilight useful. In the evening, stars begin to appear while there is still enough light to make out the horizon. In the morning, the horizon becomes visible before the stars disappear into daylight.
Civil twilight reaches its darker boundary when the Sun's center is 6° below the horizon; nautical twilight reaches its darker boundary at 12°. Those are definitions, not promises about visibility. Haze, cloud, moonlight and the condition of the horizon all affect what we can actually use. There isn't a fixed fifteen-minute window that works everywhere. Look up the twilight times for the date and position, and be ready before the window begins.
It is worth doing the paperwork while there is still plenty of light. Record our estimated position, check UTC and the watch error, note height of eye and index correction, and make a short list of targets. Once the horizon starts fading, that is not the time to begin looking for the right page.
Give each star an address in the sky
Two numbers tell us where to look. Altitude is the angle above the horizon: 0° at the horizon and 90° straight overhead. Azimuth is the direction around the horizon, measured clockwise from true north. East is 090°, south 180°, and west 270°.
A star predicted to be at altitude 42° and azimuth 090° should be roughly halfway up the eastern sky. That gives us a much smaller area to search than “somewhere over there.” These are planning numbers calculated from our estimated position and the intended observation time, not measurements that establish a fix.
Use true directions for the prediction. A magnetic compass needs the appropriate variation and, where relevant, deviation correction before its reading can be compared with a true azimuth. On a boat, a phone's compass also deserves a check rather than blind trust.
The USNO celestial-navigation service can calculate altitude and azimuth for a position and time. It lists bodies geometrically above the horizon even when daylight or proximity to the Sun would make them impractical to observe, so a name on the list is not a visibility guarantee. For a rough search, a rounded altitude is enough; accurately presetting a sextant requires accounting for the observation corrections as well.
Match the prediction to a pattern
A predicted direction is a good start. A recognizable pattern gives us another check.
Aldebaran is associated with the V-shaped head of Taurus. Alpheratz marks a corner of the Great Square of Pegasus, although the star belongs to Andromeda. Learn a few patterns in the part of the sky you can see, rather than trying to learn every constellation at once.
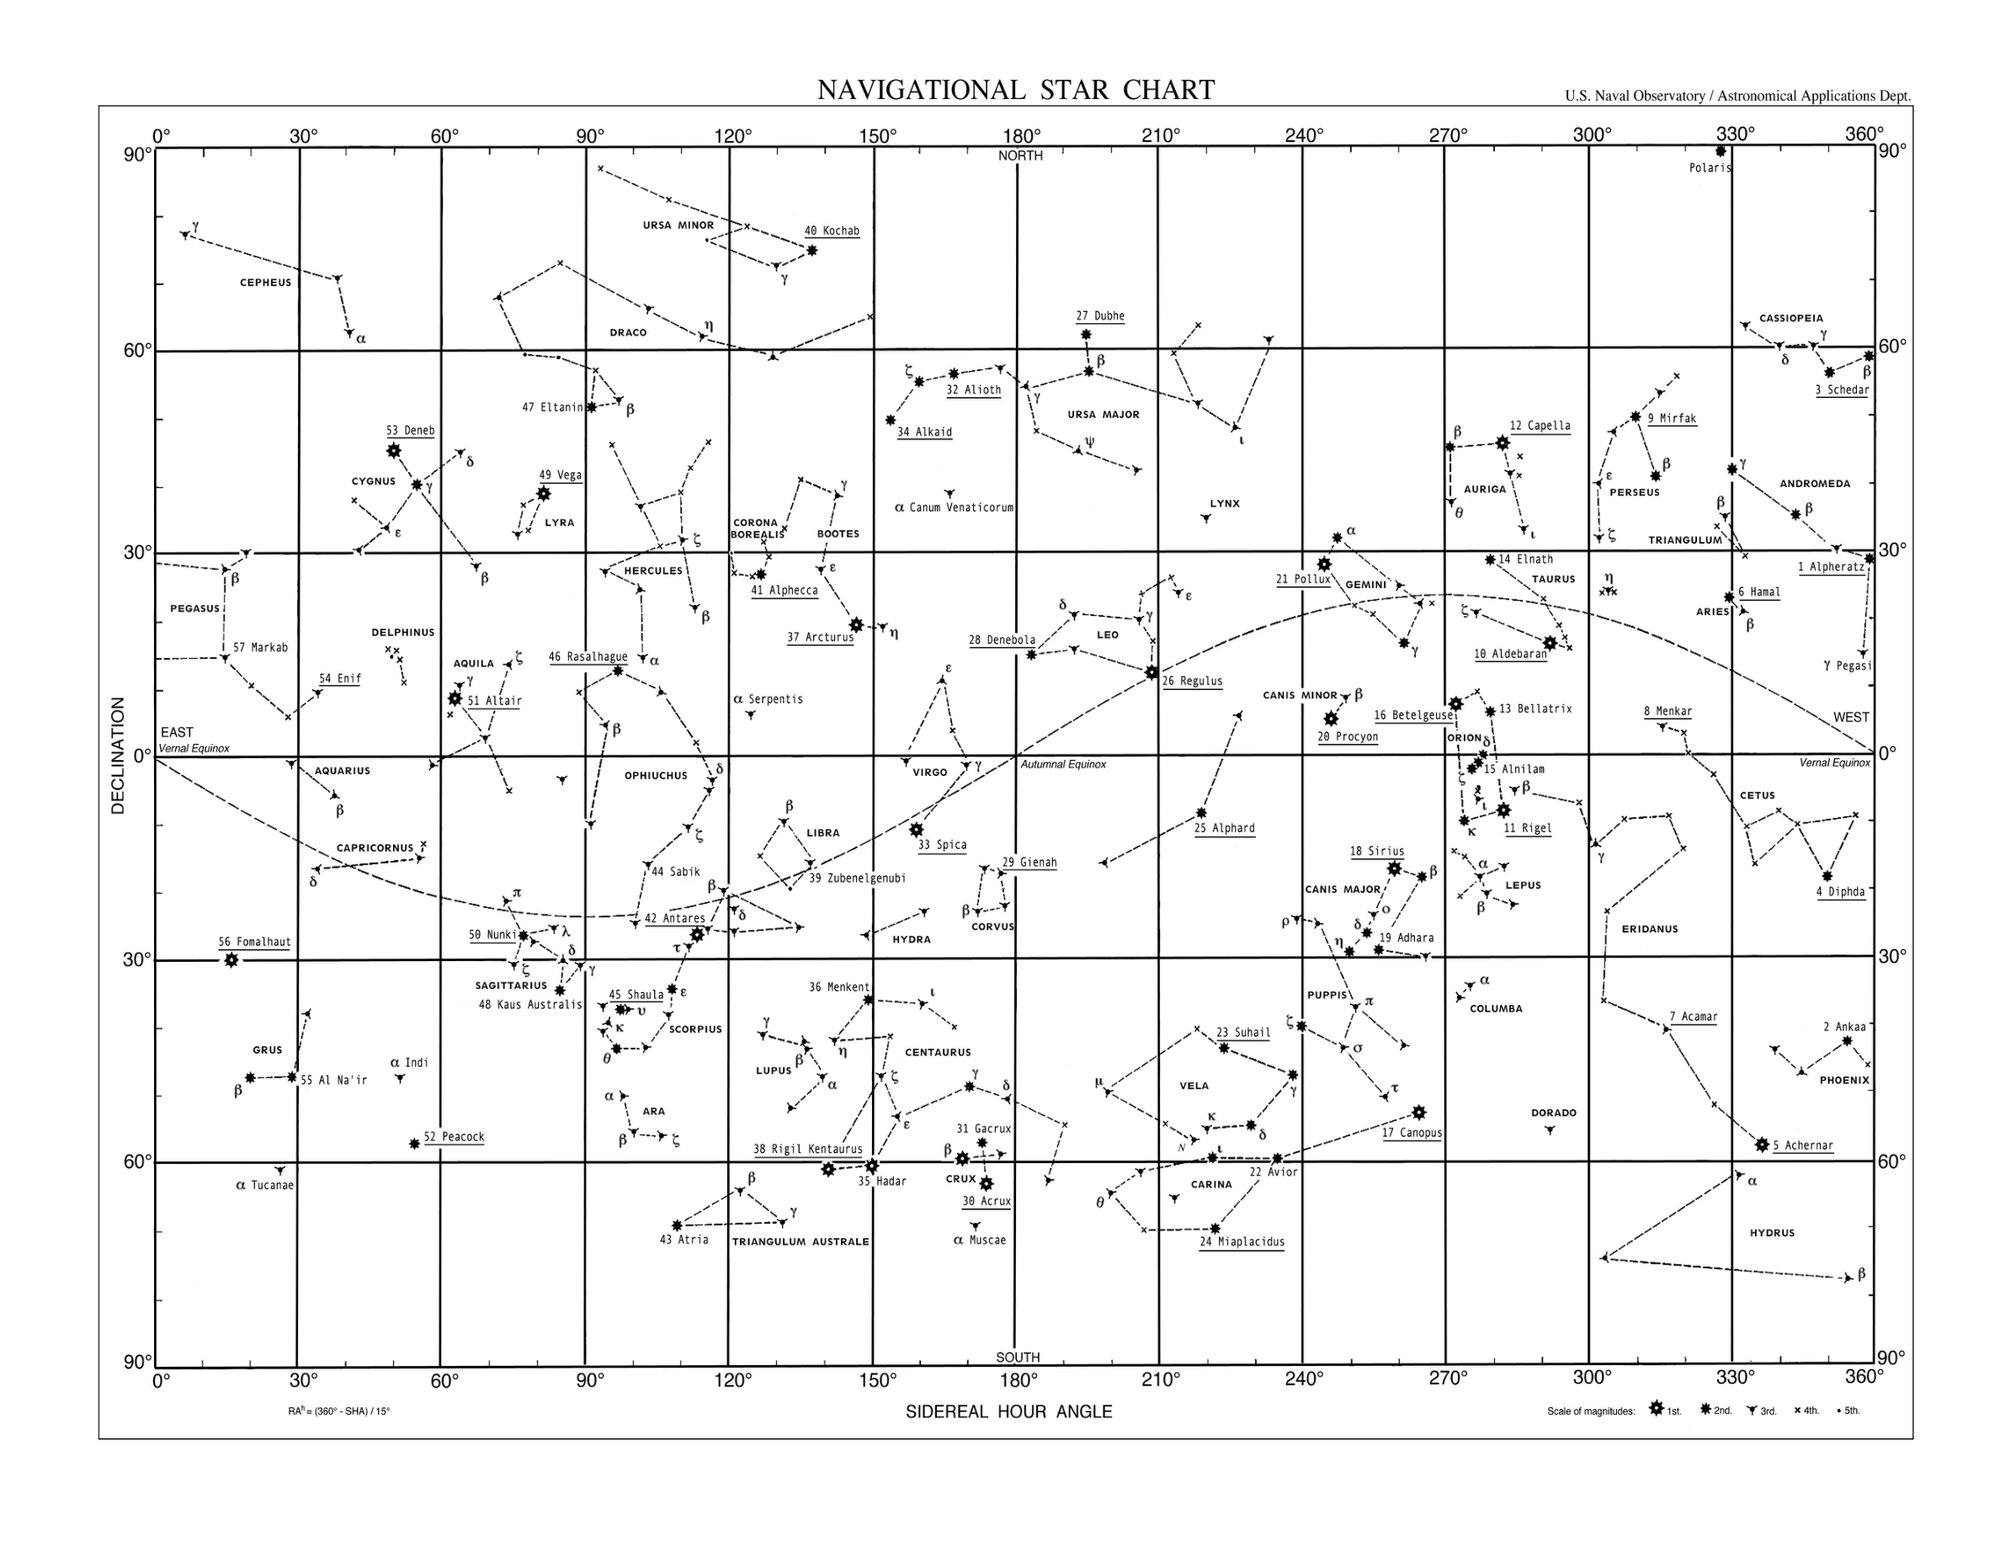
The USNO navigational star chart shows the 57 named navigational stars used in the almanacs and their surrounding constellations. It is a reference chart, not a picture of the sky above our particular boat at this moment. We still need the date, time and position to orient ourselves. The printed chart also distorts the polar regions.
Finding stars without a connection
The USNO website is handy when we have a connection. An app like Sky Guide is useful for learning the constellations and checking what we think we’re looking at. For a backup that doesn’t need a phone or a connection, there’s the 2102-D Star Finder.

The 2102-D is a rotating star chart. The base disk has the stars printed on it, with one side for each hemisphere. The clear overlay gives us a horizon and a grid for reading altitude and true azimuth. We bring a current Nautical Almanac, a watch set to UTC, and an estimated position.
First, put the north side of the star disk up. We’re near 18°15′ N, so the closest clear overlay is 15° N. Now we need to know how far to turn it.
To set the overlay, we use a reference point called Aries. Think of it as the sky’s version of Greenwich, a starting point for measuring east and west. It’s where the Sun’s yearly path crosses the celestial equator heading north. We don’t have to find it in the sky. The almanac tells us how far west of Greenwich it is (GHA Aries). What we need for the overlay is how far west it is from our own meridian (LHA Aries).
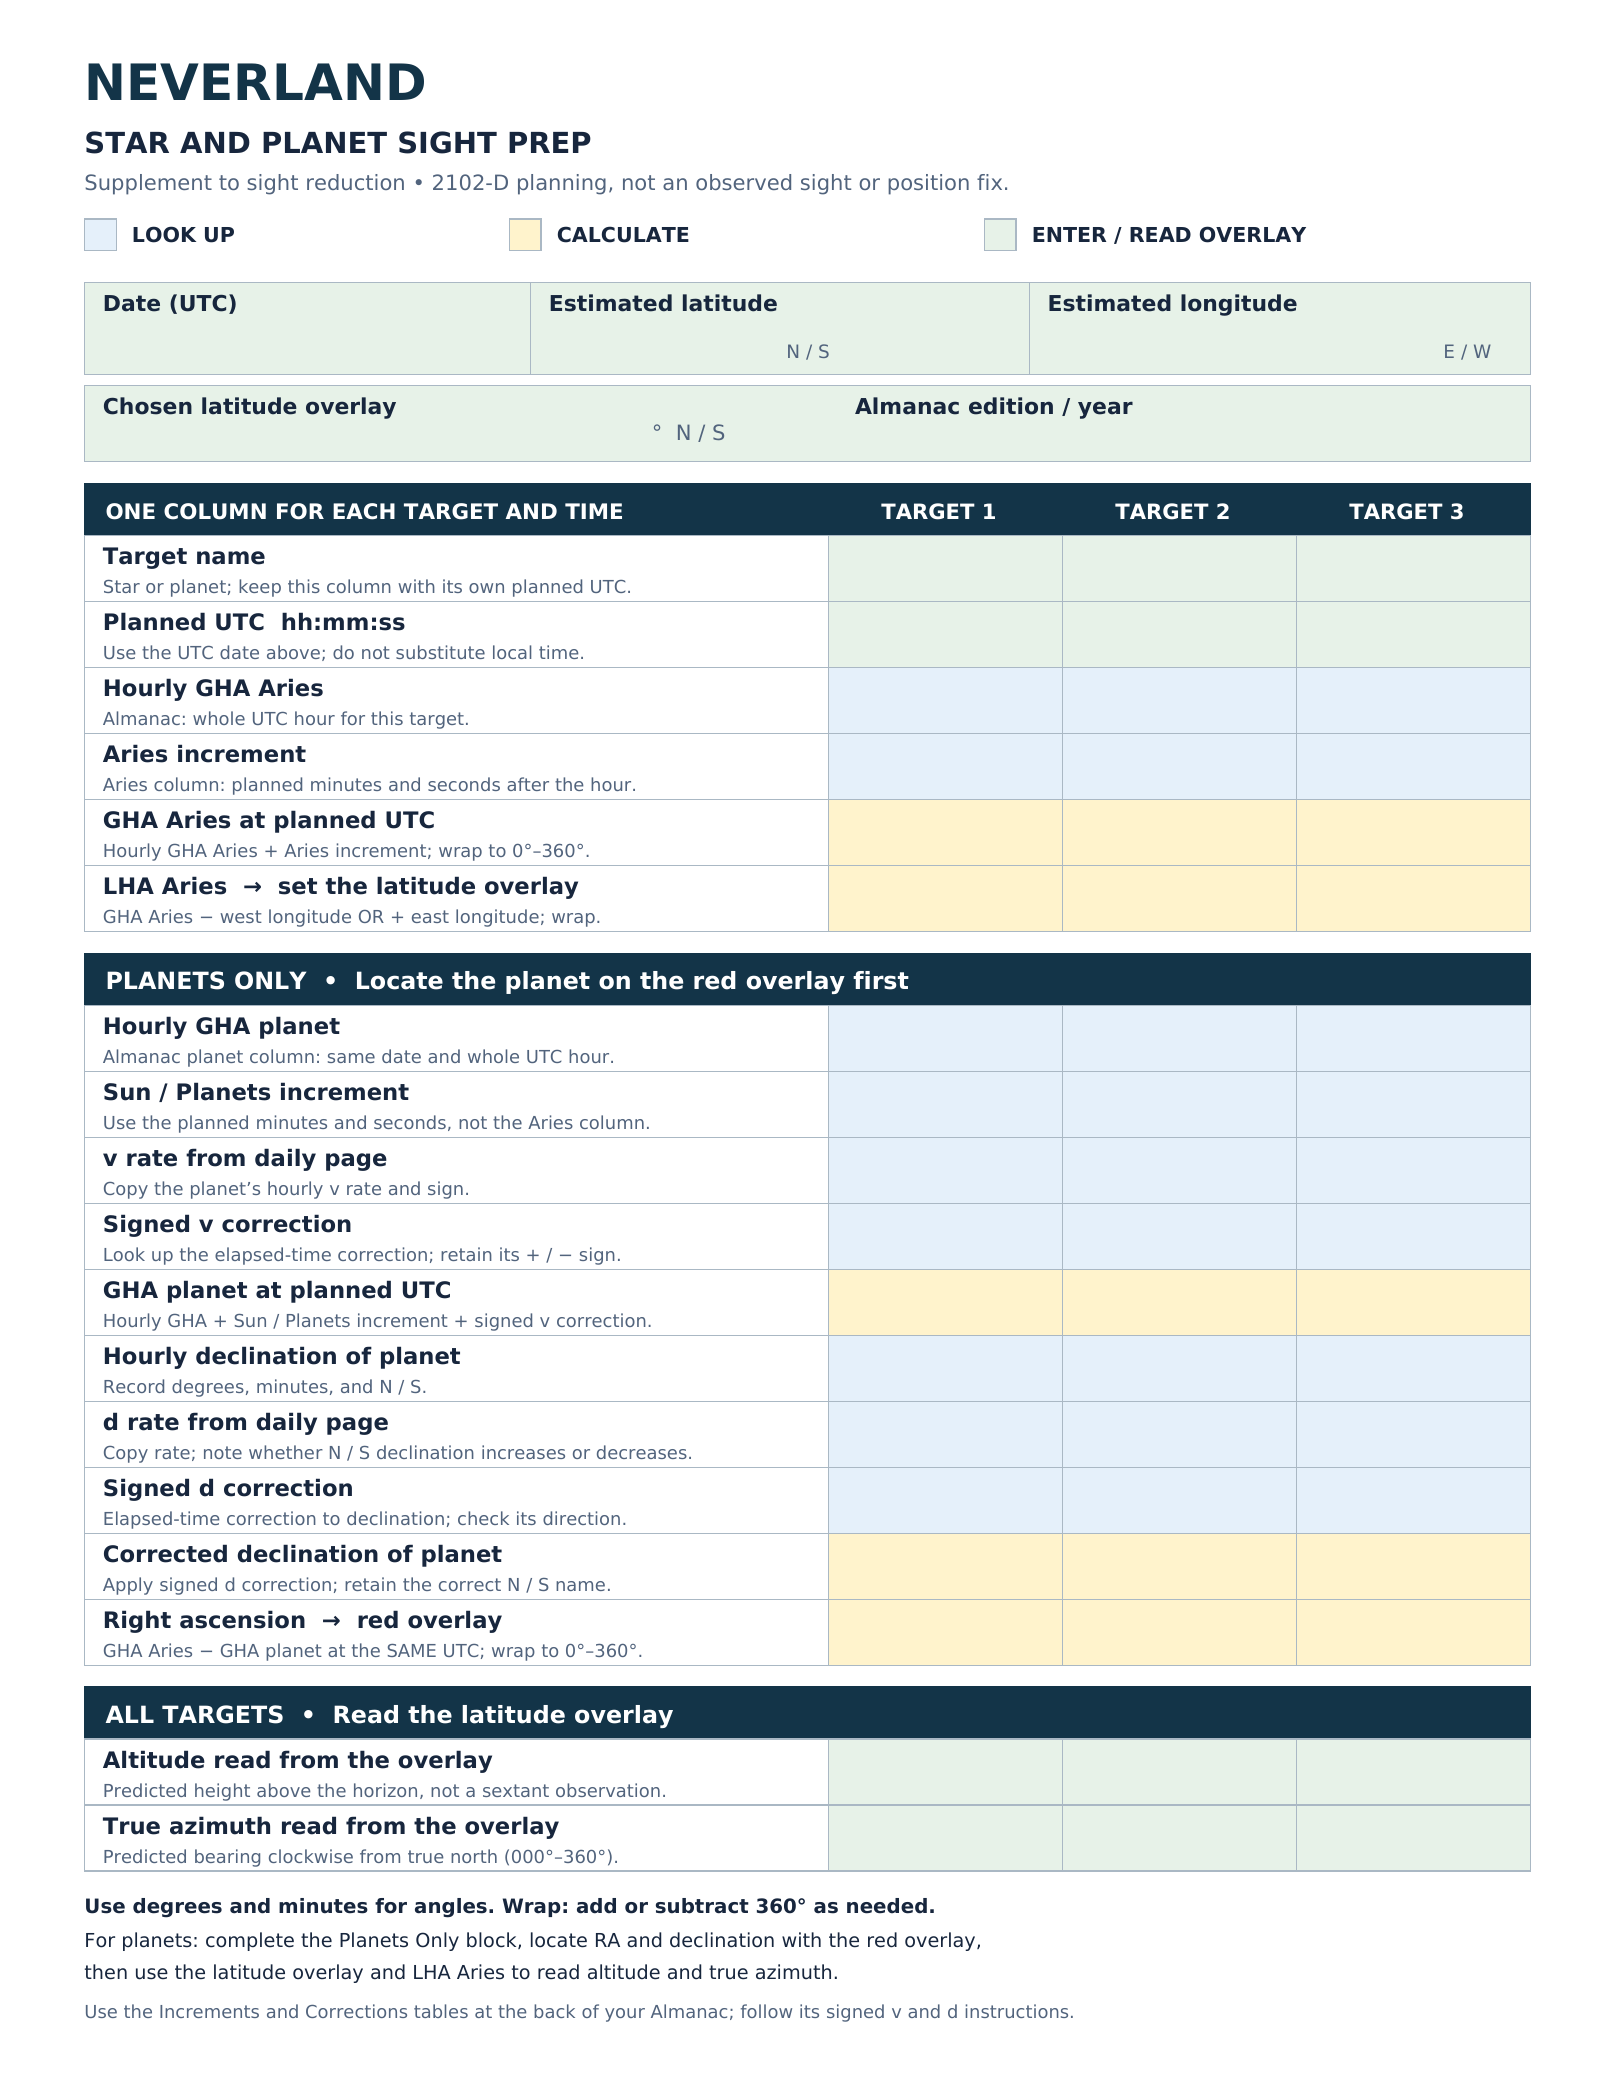
Neverland’s Star and Planet Sight Prep sheet
This is the sheet we’ll work through below.
Work down the prep sheet
The supplemental Star and Planet Sight Prep sheet is where we write down what we expect to see before taking a sight. The sight-reduction worksheet from Part 2 stays as it is. Use one column per target and time. Green is what we enter or read off the finder, blue is what we look up, and yellow is what we calculate.
Start at the top. Enter 10 January 2026 (UTC), our estimated position of 18°15′ N, 65°00′ W, the 15° N overlay, and the 2026 Nautical Almanac. Then enter our three targets and their planned UTC times.
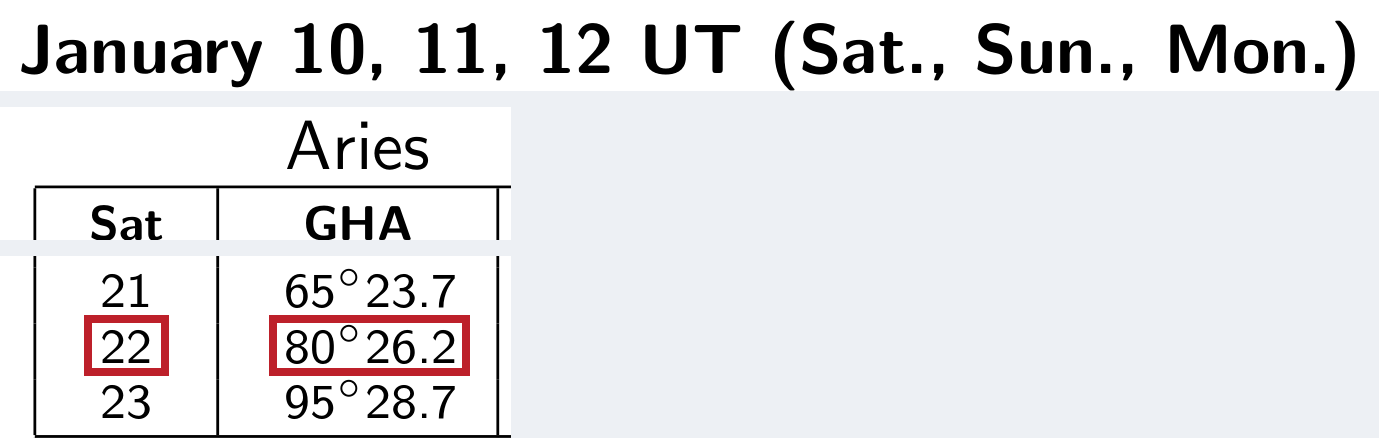
Hourly GHA Aries: For 22:30:00, the whole hour is 22:00. On the January 10 daily page, find row 22 and read across to Aries. All three targets are in the same hour, so 80°26.2′ goes in all three columns.
Aries increment: The minutes and seconds go in a different table, Increments and Corrections, at the back of the book. For 22:30:00, find the block headed 30 minutes, go down to row 0 for zero seconds, and across to Aries. Copy 7°31.2′. Same rule for any time: minutes pick the block, seconds pick the row, and Aries picks the column.

Now fill the two yellow rows. Add the increment to the hourly GHA. Then subtract our west longitude to get the angle for the blue overlay. If you’re east of Greenwich, add your longitude instead. If either answer is below 0° or at least 360°, add or subtract 360° to bring it back onto the scale.
| Prep sheet | Aldebaran | Saturn | Alpheratz |
|---|---|---|---|
| Planned UTC (hh:mm:ss) | 22:30:00 | 22:32:00 | 22:34:00 |
| Hourly GHA Aries | 80°26.2′ | 80°26.2′ | 80°26.2′ |
| Aries increment | 7°31.2′ | 8°01.3′ | 8°31.4′ |
| GHA Aries at planned UTC | 80°26.2′ + 7°31.2′ = 87°57.4′ | 80°26.2′ + 8°01.3′ = 88°27.5′ | 80°26.2′ + 8°31.4′ = 88°57.6′ |
| LHA Aries → set the latitude overlay | 87°57.4′ − 65°00.0′ = 22°57.4′ | 88°27.5′ − 65°00.0′ = 23°27.5′ | 88°57.6′ − 65°00.0′ = 23°57.6′ |
For Aldebaran, turn the blue overlay until its Aries arrow points to about 23° on the rim. Find Aldebaran on the disk and use the grid over it to read how high to look and in what direction. Put those two readings in the last block of the prep sheet. Alpheratz works the same way. For Saturn, hold off on those rows until we’ve put it on the disk.
When the star you’re looking at is a planet
Say you’re looking for a star and there’s an extra bright point where you didn’t expect one. It might be a planet. The Nautical Almanac gives us four we can use: Venus, Mars, Jupiter and Saturn. They tend to show up near the path the Sun follows through the constellations, but they move against the stars. So that bright point can be useful once we know what it is.
Start with the planet’s predicted altitude and true azimuth for the time and place we’ll be observing. The USNO planning table gives us both. Then check the surrounding stars in Sky Guide or against a familiar pattern. For our St Thomas exercise, we’re looking for Saturn about 57° up, bearing 232° true (southwest), at 22:32 UTC. If the planet is too low, lost in the Sun’s glare, or blocked by cloud, pick another target. A bright point that doesn’t twinkle much is a clue, not an identification.
On the 2102-D, the stars are already printed. For Saturn, we have to add a dot. This is what the Planets Only block of the prep sheet is for: it gives us the two numbers we need to mark Saturn on the disk.
Fill the Planets Only block for Saturn

Start with Saturn’s 22h GHA and declination from the January 10 daily page. The table carries the S 3° down from the earlier labeled row, so 18.5 on row 22 means S 3°18.5′. The same page gives the v rate for GHA and the d rate for declination. Use the 32-minute block at the back for both corrections and the Sun/Planets increment from the excerpt above.
The v correction is positive. For d, the south declination is getting smaller on the daily page, so subtract the correction from the southern magnitude. Save the results in the yellow rows.
Fill in the Saturn column
| Prep sheet: Planets Only | Saturn at 22:32:00 UTC |
|---|---|
| Hourly GHA planet | 82°28.2′ |
| Sun / Planets increment | 8°00.0′ |
| v rate from daily page | +2.3′ per hour |
| Signed v correction | +1.2′ |
| GHA planet at planned UTC | 82°28.2′ + 8°00.0′ + 1.2′ = 90°29.4′ |
| Hourly declination of planet | S 3°18.5′ |
| d rate from daily page | 0.1′ per hour; south declination decreasing |
| Signed d correction | −0.1′ from the south magnitude |
| Corrected declination of planet | S 3°18.5′ − 0.1′ = S 3°18.4′ |
| Right ascension → red overlay | 88°27.5′ − 90°29.4′ + 360° = 357°58.1′ |
Put Saturn on the disk
Right ascension is the angle east from Aries. The worksheet gives us about 358° and 3°18′ south. Put the red template on the north side of the disk, turn its zero arrow to 358°, and mark Saturn in the slot just outside the equator at 3°18′ south. Then put the blue overlay back on with its Aries arrow at about 23½°. Read Saturn’s altitude and bearing the same way we did for Aldebaran.
All targets: read the latitude overlay
Finish by writing down how high to look and in what direction. These are rounded examples calculated for the 15° N overlay, not measured sights. The 15° N overlay isn’t centered on our exact latitude, so its numbers won’t quite match a prediction for 18°15′ N. That’s fine. This sheet gets us looking in the right patch of sky.
| Prep sheet | Aldebaran | Saturn | Alpheratz |
|---|---|---|---|
| Altitude read from the overlay | About 45° | About 59° | About 66° |
| True azimuth read from the overlay | About 080° | About 235° | About 310° |
Choose targets in different directions when possible. Several stars crowded into one patch of sky tend to produce lines of position with less useful crossing angles. A good-looking selection on paper may still be blocked by cloud, a sail or the boat's structure, so have another identifiable target in mind. A very low star brings more difficult refraction and horizon conditions; one nearly overhead can be awkward to observe. We are looking for a useful set, not simply the brightest objects.
From the prep sheet to the sky
We’ve picked Aldebaran, Saturn, and Alpheratz and worked out where to look for each one. The chart below shows all three together at 22:30 UTC (18:30 AST), the start of our practice session near St Thomas. For each sight, use the directions we worked out for that target’s own time.
We’re staying in one place for this exercise, near 18°15′ N, 65°00′ W on 10 January 2026. Unlike the earlier running fix, there’s no boat movement to account for. The sights in the next part are simulated.
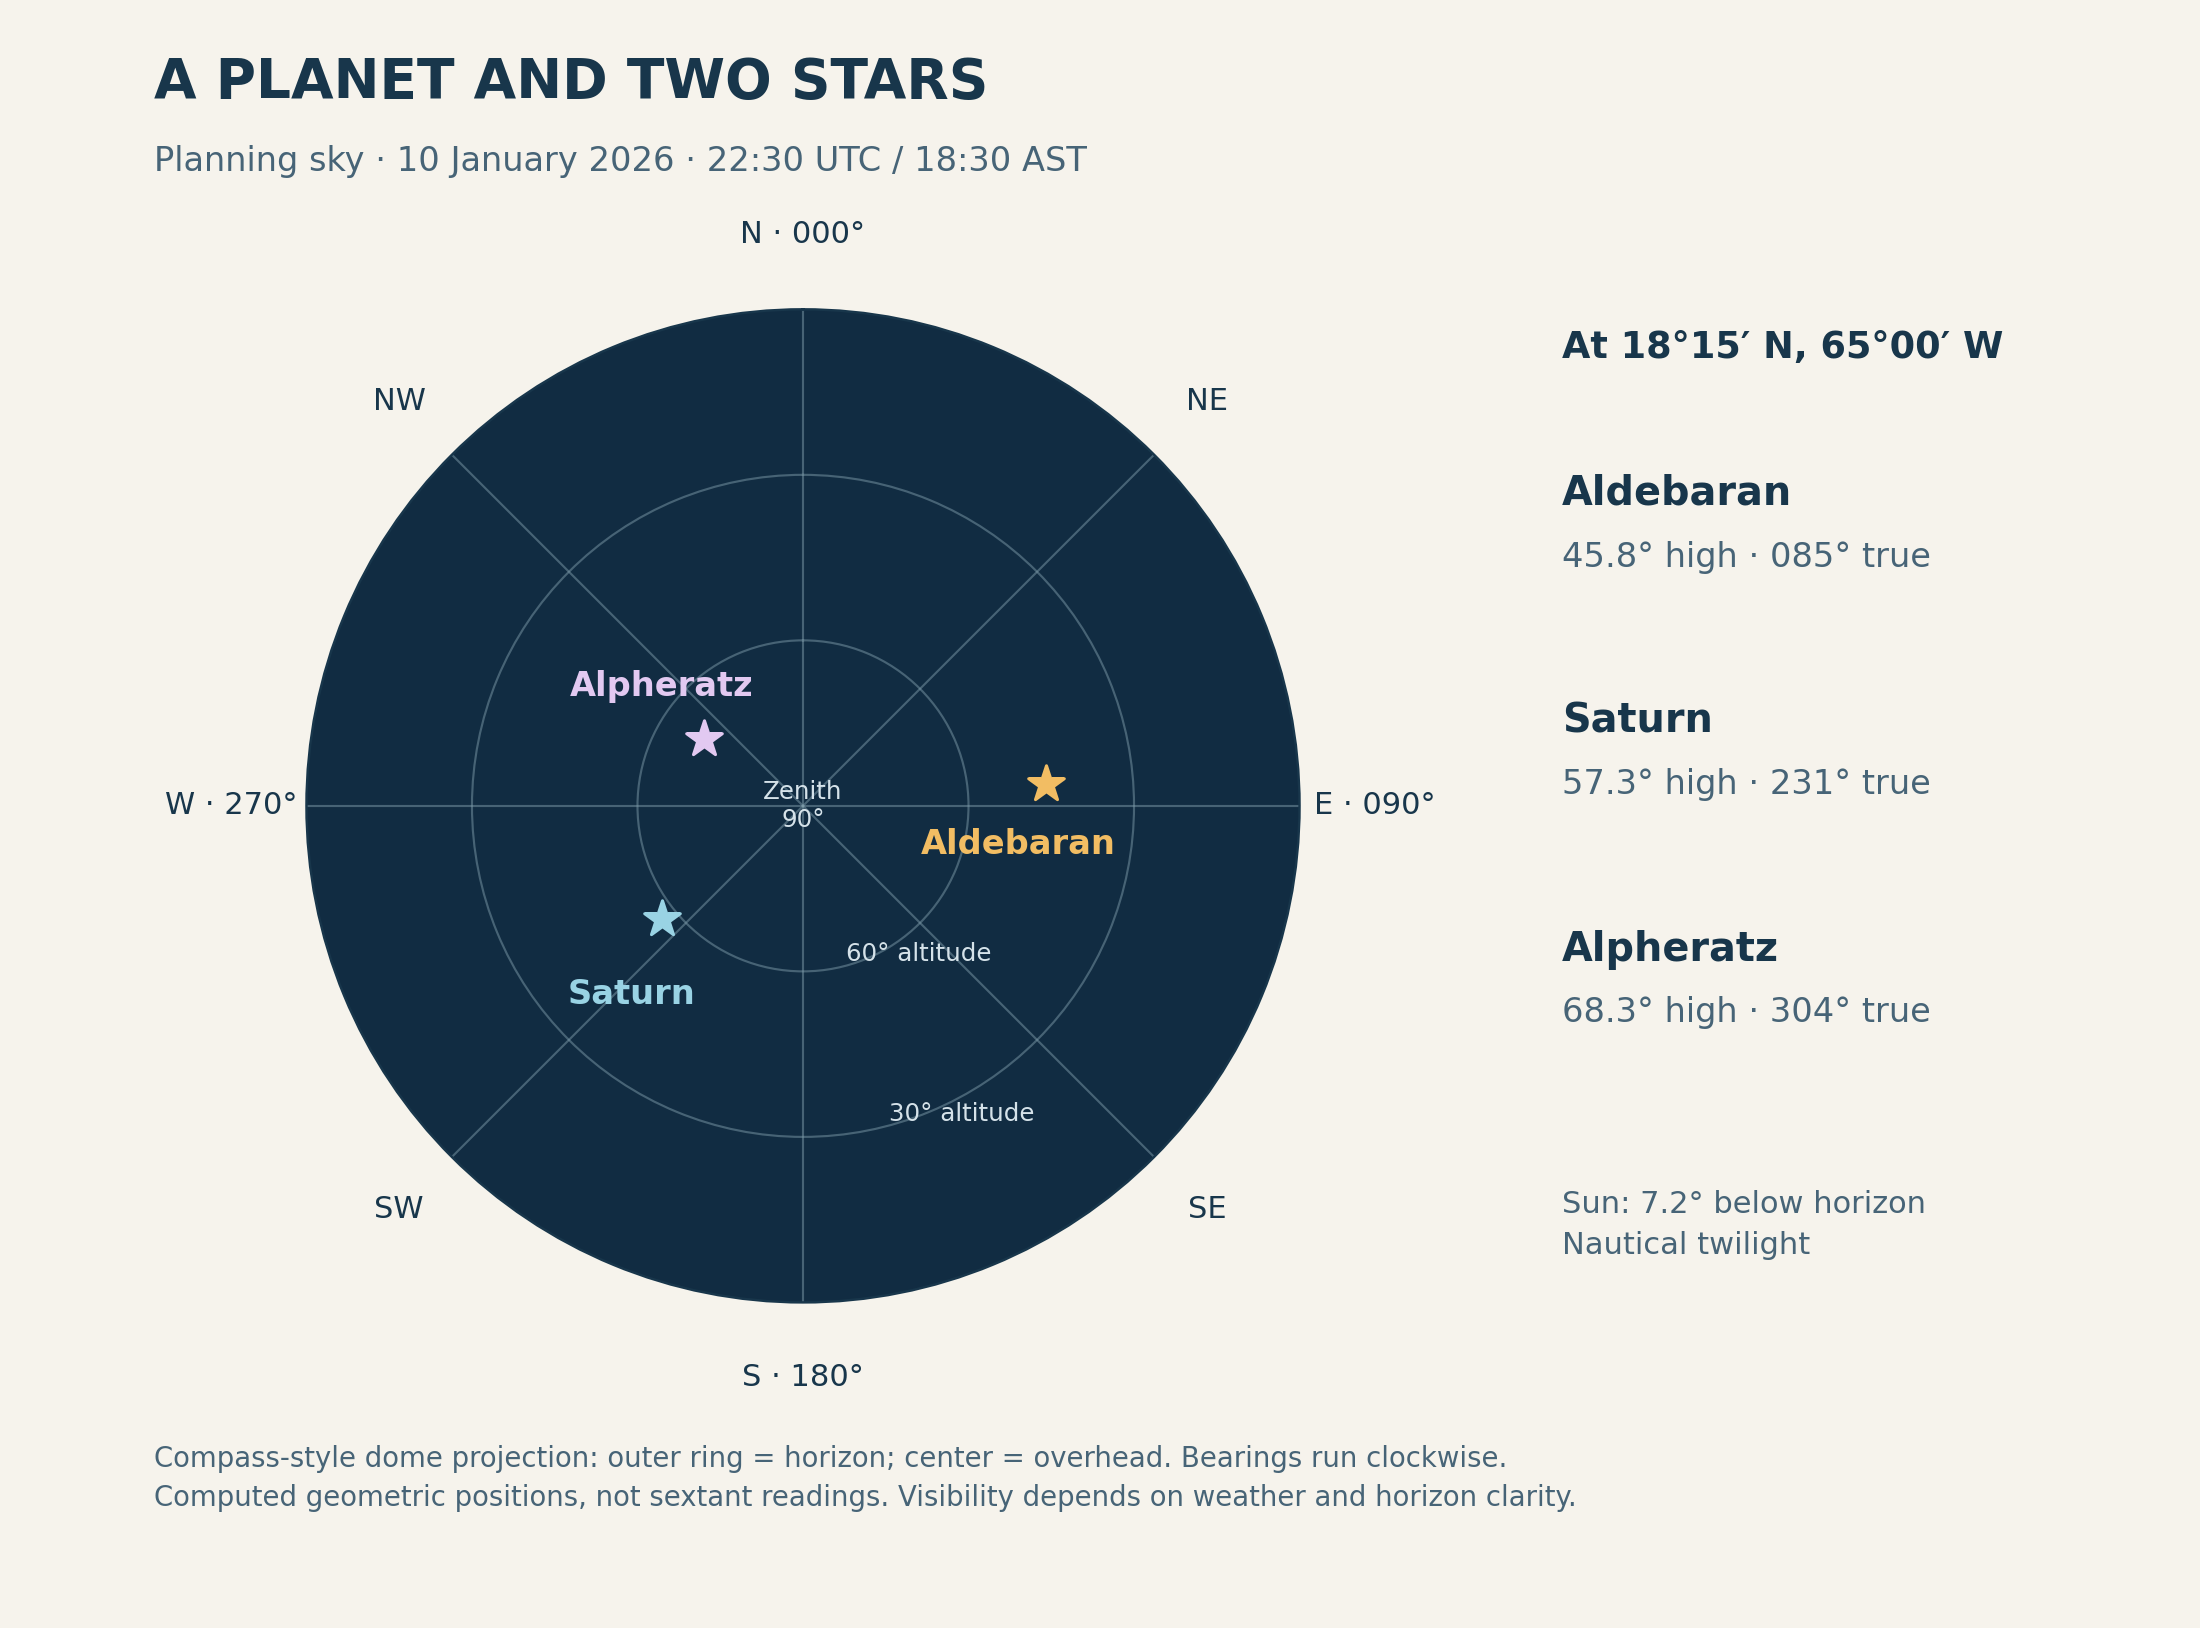
The diagram puts Saturn roughly 57° above the southwestern horizon at the planning time. Its position comes from NASA JPL Horizons, not from the star list. In Part 6, we will use Saturn’s own almanac data at its actual simulated sight time.
Make the observation easy to check later
For each sight, record the star or planet's name, the UTC date and time to the second, and the sextant reading. Keep the readings separate. “The bright one to the left” will not be much help when we sit down with the almanac.
If the identification is uncertain, mark it as uncertain and take another sight of something we can identify. Don't force an observation to agree with the position we expected. A repeat sight, a different body and a check of the recorded time are more useful than quietly changing a name or a number.
In Part 6, we will take Aldebaran and Saturn through the same worksheet we used for the Sun. Most of it will look familiar. The main changes are how we find each body's geographical position and correct the altitude we measured.
Next in the series: Part 6: The Sun clocked out, but the math didn’t (working star and planet sights)