The Basics of Celestial Navigation, Part 3: Connecting the Dots
Math class meets art class: plotting lines of position and a running fix on a plotting sheet.

- Introduction: why we want a backup to GPS
- Part 1: The math that makes the world go round
- Part 2: Turning sunshine into math (working a Sun sight)
- Part 3: Connecting the dots (plotting a running fix) (you are here)
- Part 4: High noon, low math (latitude by noon sight)
- Part 5: Finding the second star on the right (identifying stars and planets)
- Part 6: The Sun clocked out, but the math didn’t (working star and planet sights)
- Part 7: Three lines walk into a bar (plotting a three-body fix)
In Part 2, we worked through a Sun sight and ended up with an assumed position, an azimuth and an intercept. Now we can put those numbers on paper. One sight gives us a line of position. A second sight, combined with an estimate of how far the boat has moved, gives us a running fix.
We will keep using our simulated St Thomas example from 10 January 2026. The observations are practice values, not actual sights taken aboard Neverland. The track is a plotting exercise, not a verified route through these waters.
The numbers we will plot
| First sight | Second sight | |
|---|---|---|
| Time AST / UTC | 09:52 / 13:52 | 14:52 / 18:52 |
| Assumed position | 18° N, 65°06.8′ W | 18° N, 65°05.6′ W |
| True azimuth Zn | 134° | 224° |
| Intercept | 2.3 nm Away | 5.6 nm Toward |
The first set comes straight from Part 2. For the second sight, the simulated Hs is 36°41.4′. With zero index correction and the same 9 ft height of eye, subtract 2.9′ for dip to obtain Ha 36°38.5′. The almanac’s refraction table gives −1.2′ at our precision; January lower-limb semidiameter adds 16.3′. The combined correction is +15.1′, giving Ho 36°53.6′. Pub. 249 gives corrected Hc 36°48.0′, so the intercept is 5.6 nm Toward. We use the same almanac correction method for both sights.
Between sights, assume 7 knots over the ground on 270° true for five hours: 35 nautical miles west. This exercise assumes no current or leeway. On a real boat, use your best estimate of movement over the ground, accounting for both. The starting DR, 18°15.0′ N, 64°55.0′ W, is only an estimate; the first sight did not establish it as a fix.
Have a sharp pencil, eraser, dividers and parallel rulers or a plotting protractor ready. All bearings below are true, not magnetic.
The plotting sheet
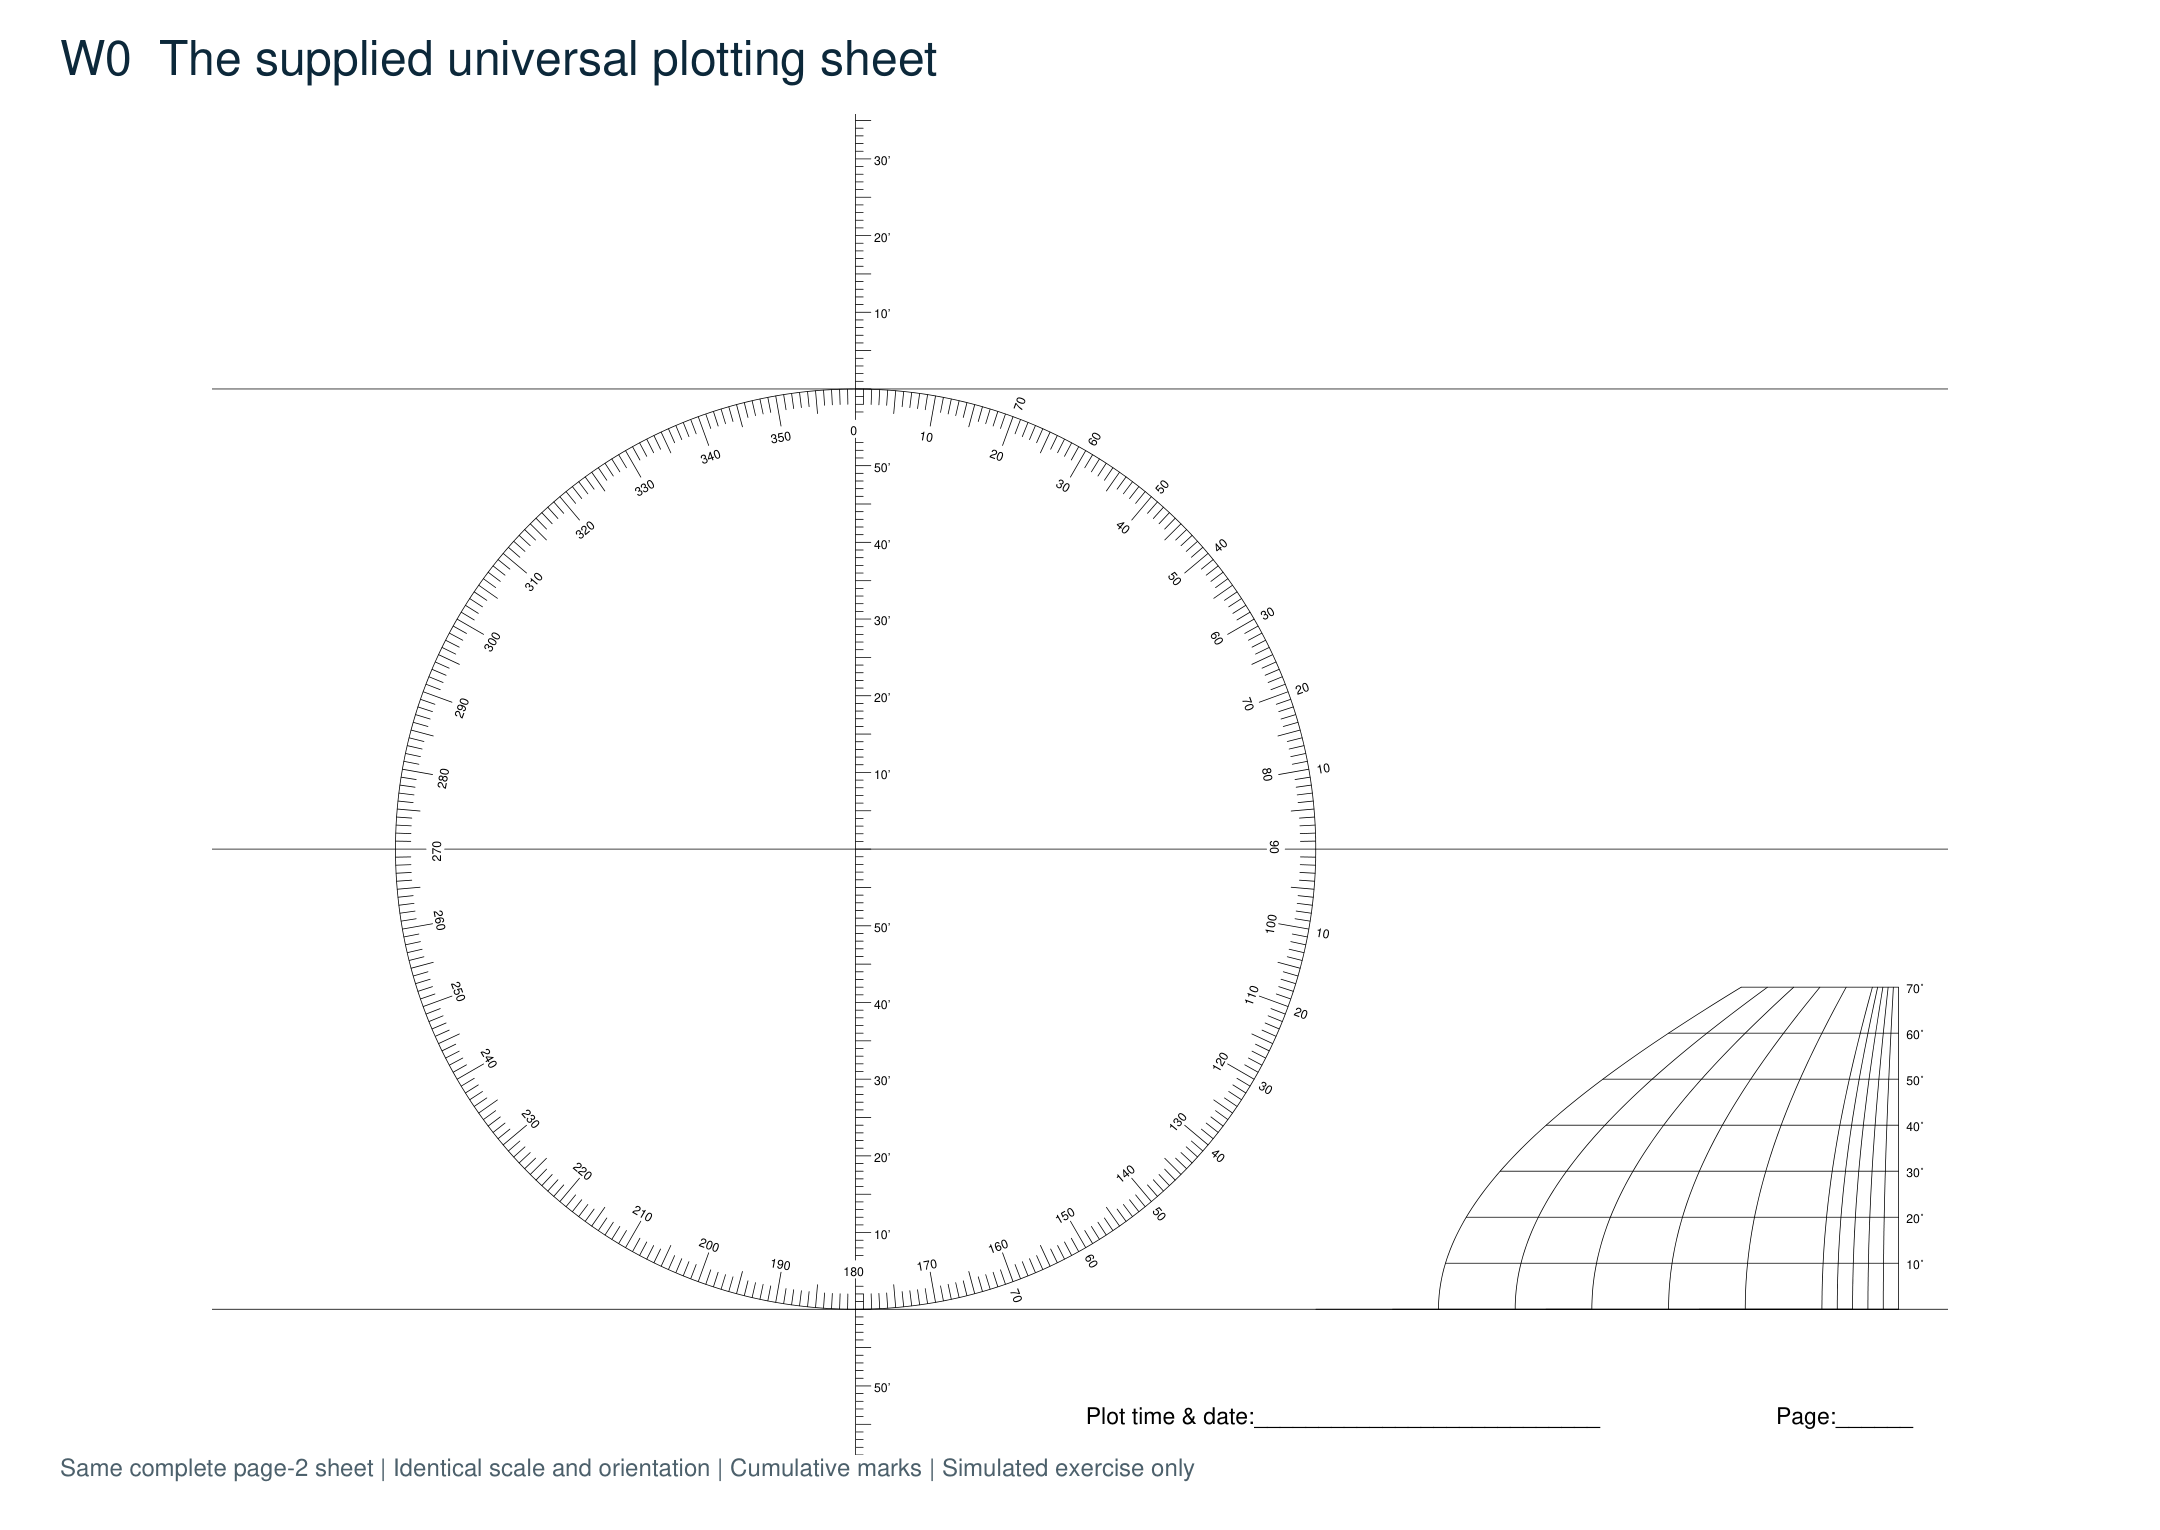
Every main figure uses the complete original universal plotting sheet, page 2, rotated upright. The orientation and scale stay the same as marks accumulate. Its central meridian carries the latitude scale; the lower-right conversion scale lets us measure longitude at our chosen latitude. Enlargements later in the post are exact crops of these same sheets, not replacement diagrams.
1. Label the sheet and construct the meridians
Label the parallels 17° N, 18° N and 19° N, with 18° N in the middle. Label the central meridian 65° W. On the compass rose, mark 18° above and below east: bearings 072° and 108°, not 018°. Join those points vertically for 64° W, and mirror that spacing to the left for 66° W. Mark the 18° row on the lower-right longitude scale and use it throughout. West longitude increases leftward; north latitude increases upward.
2. Mark the first assumed position
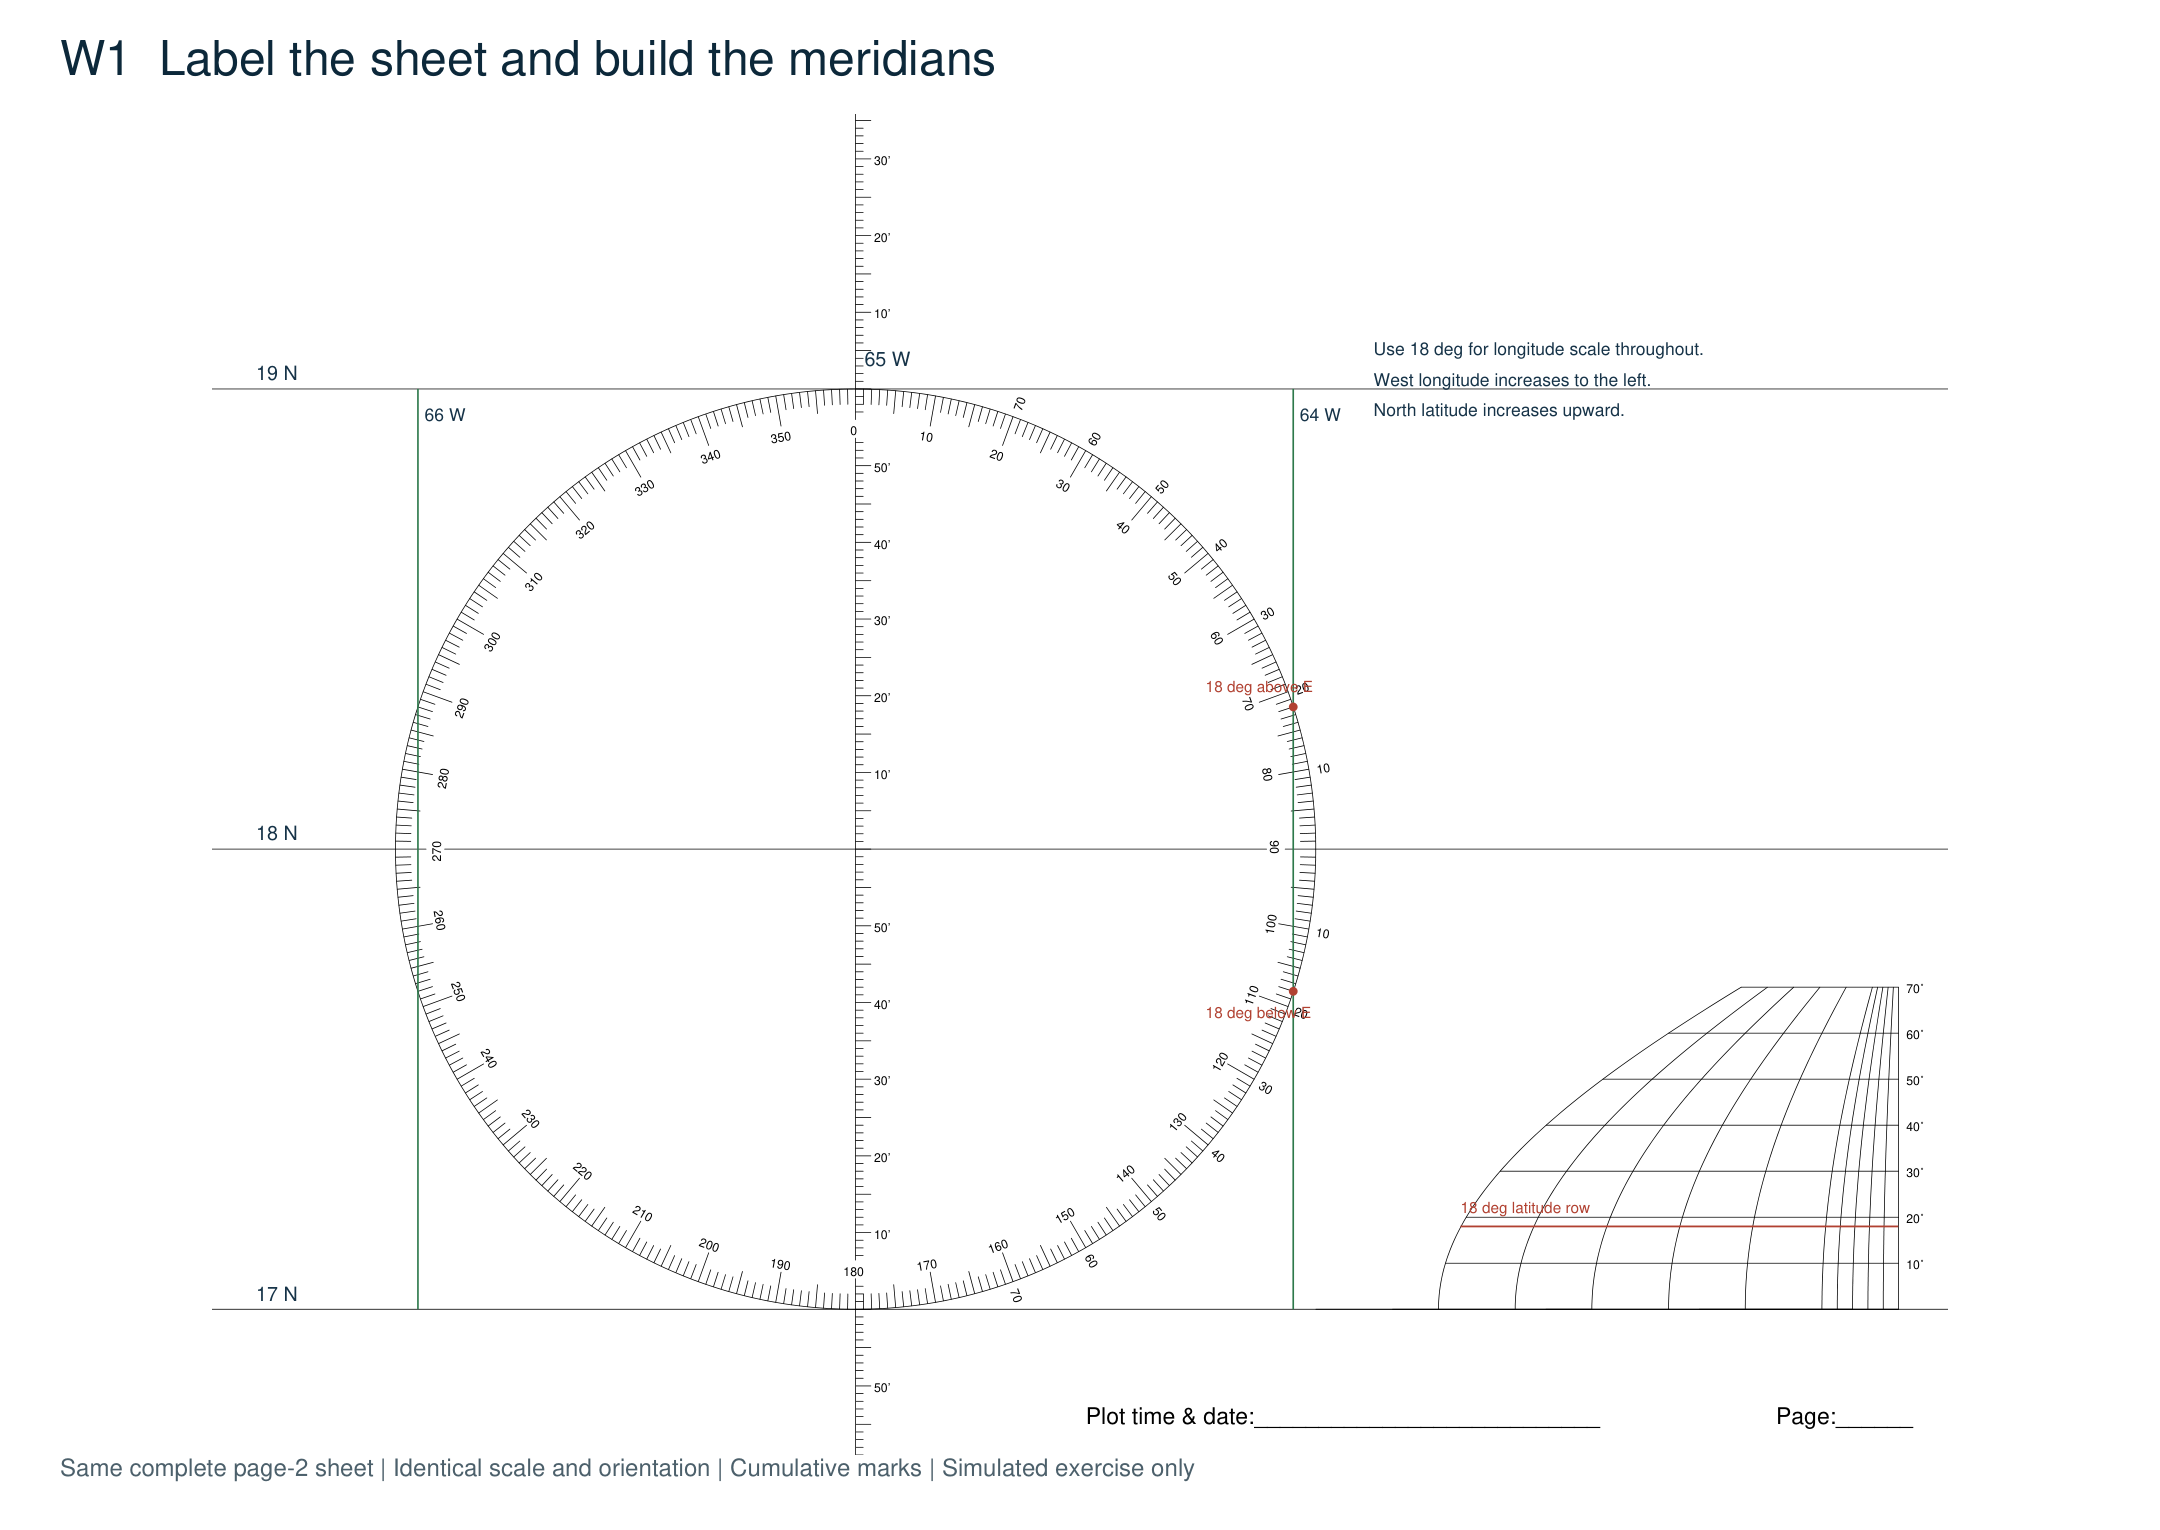
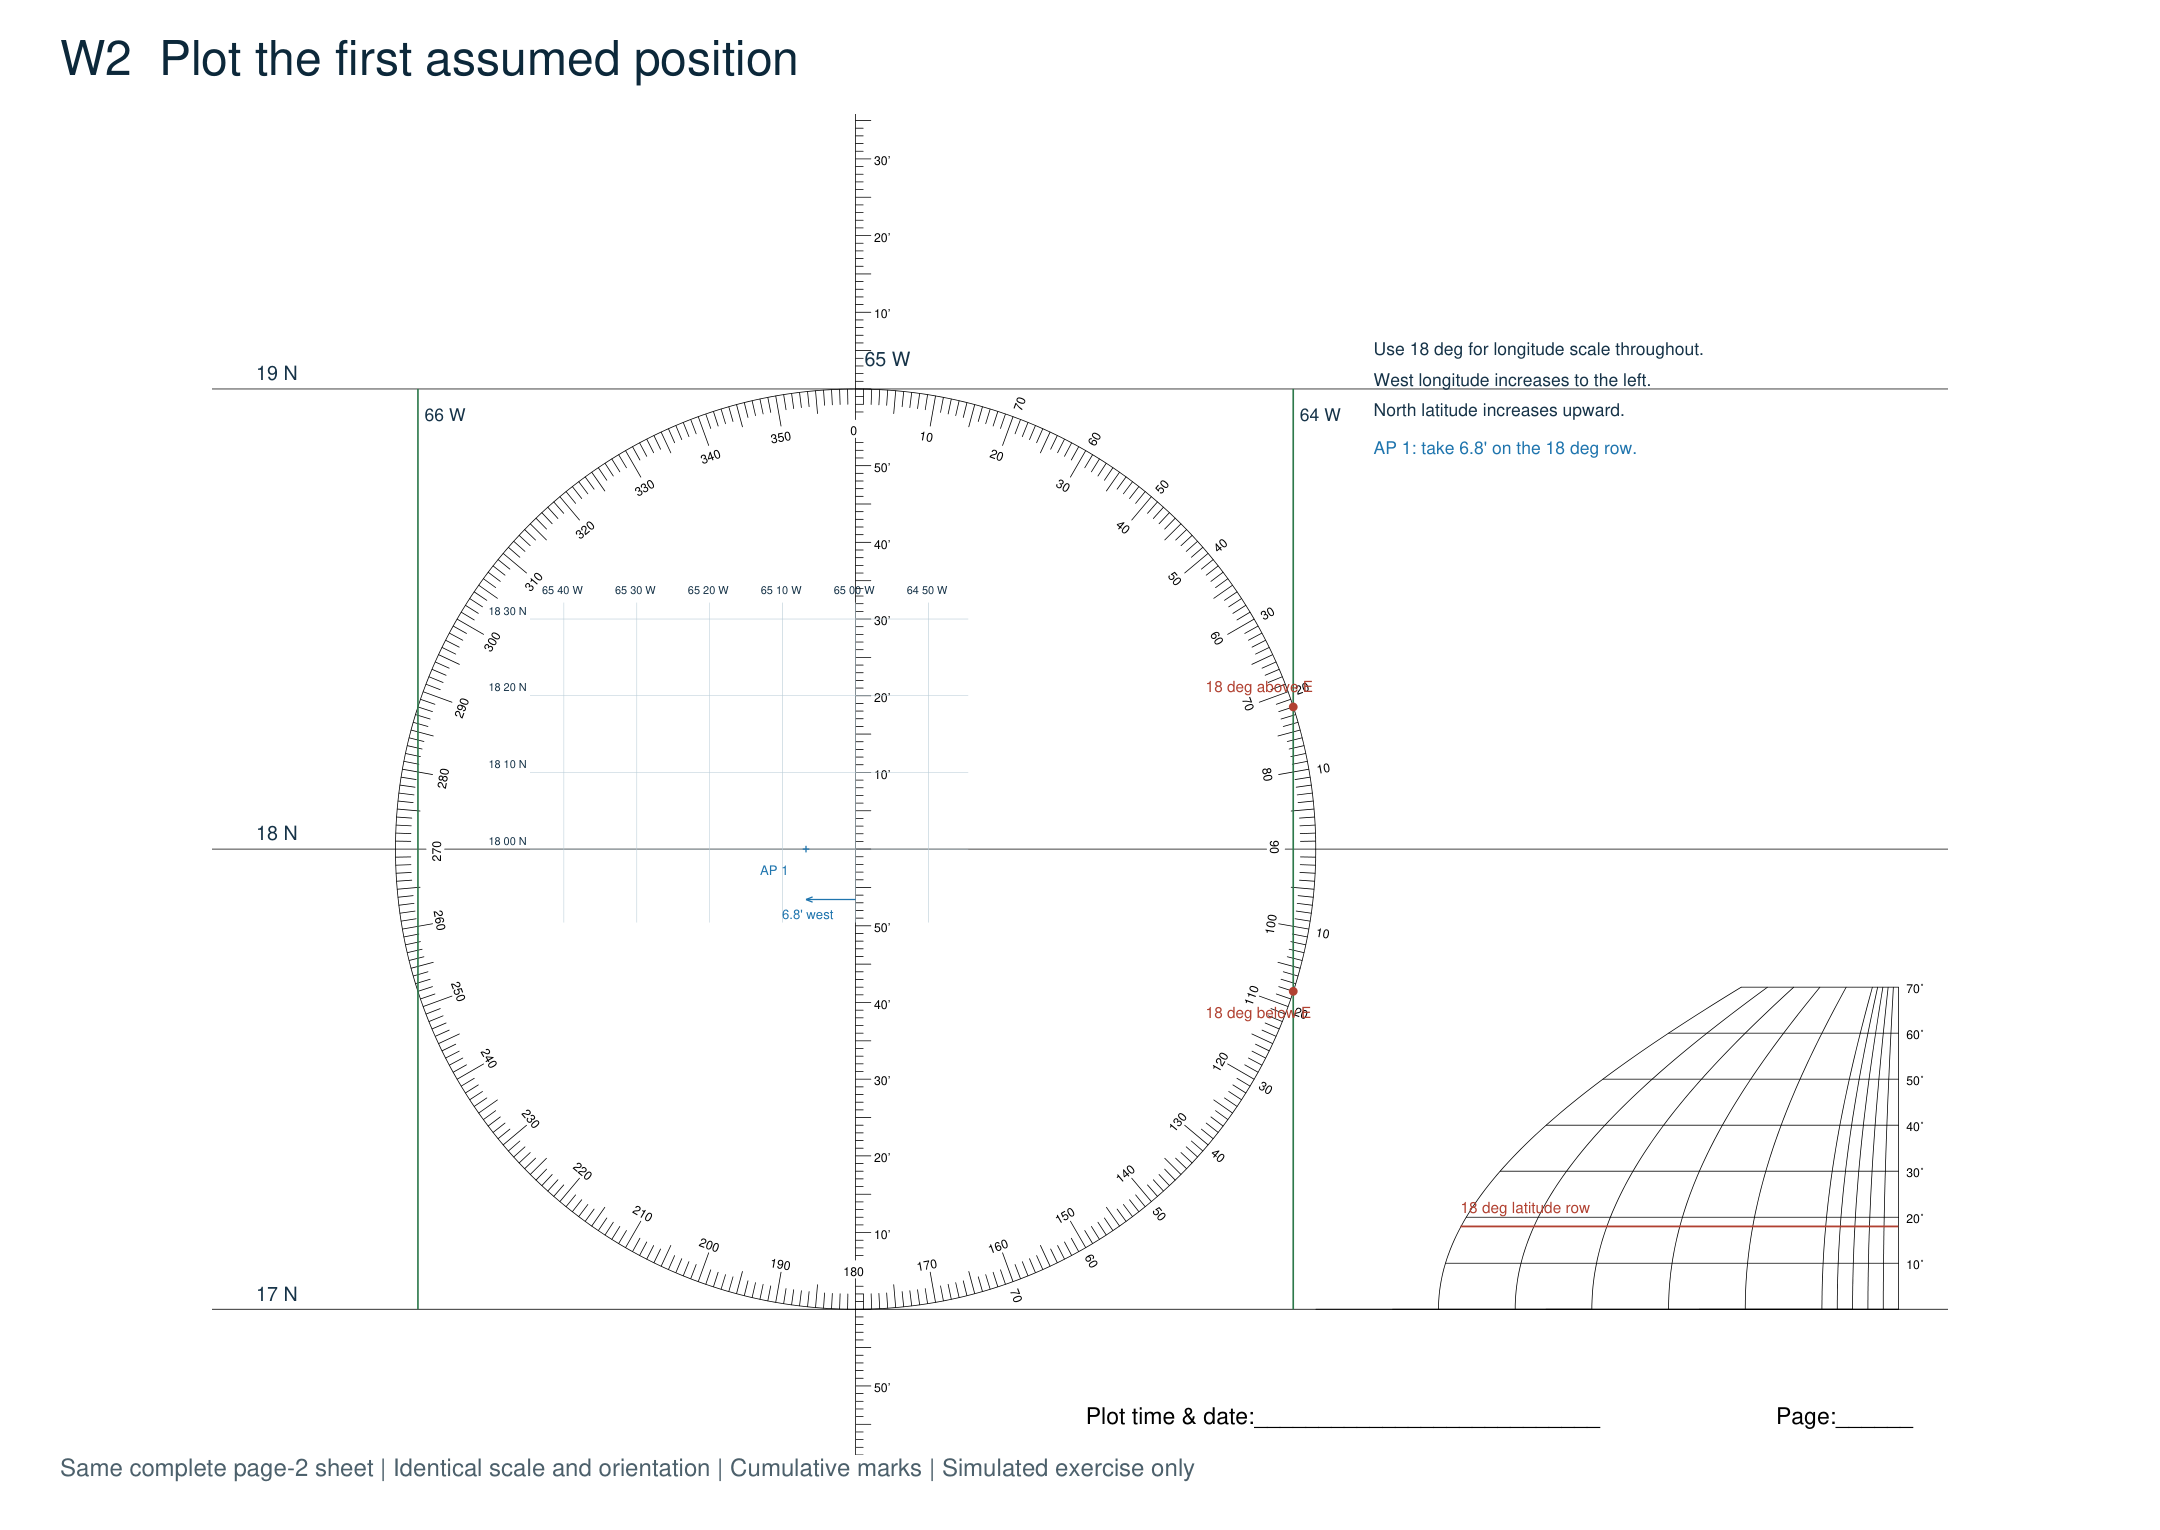
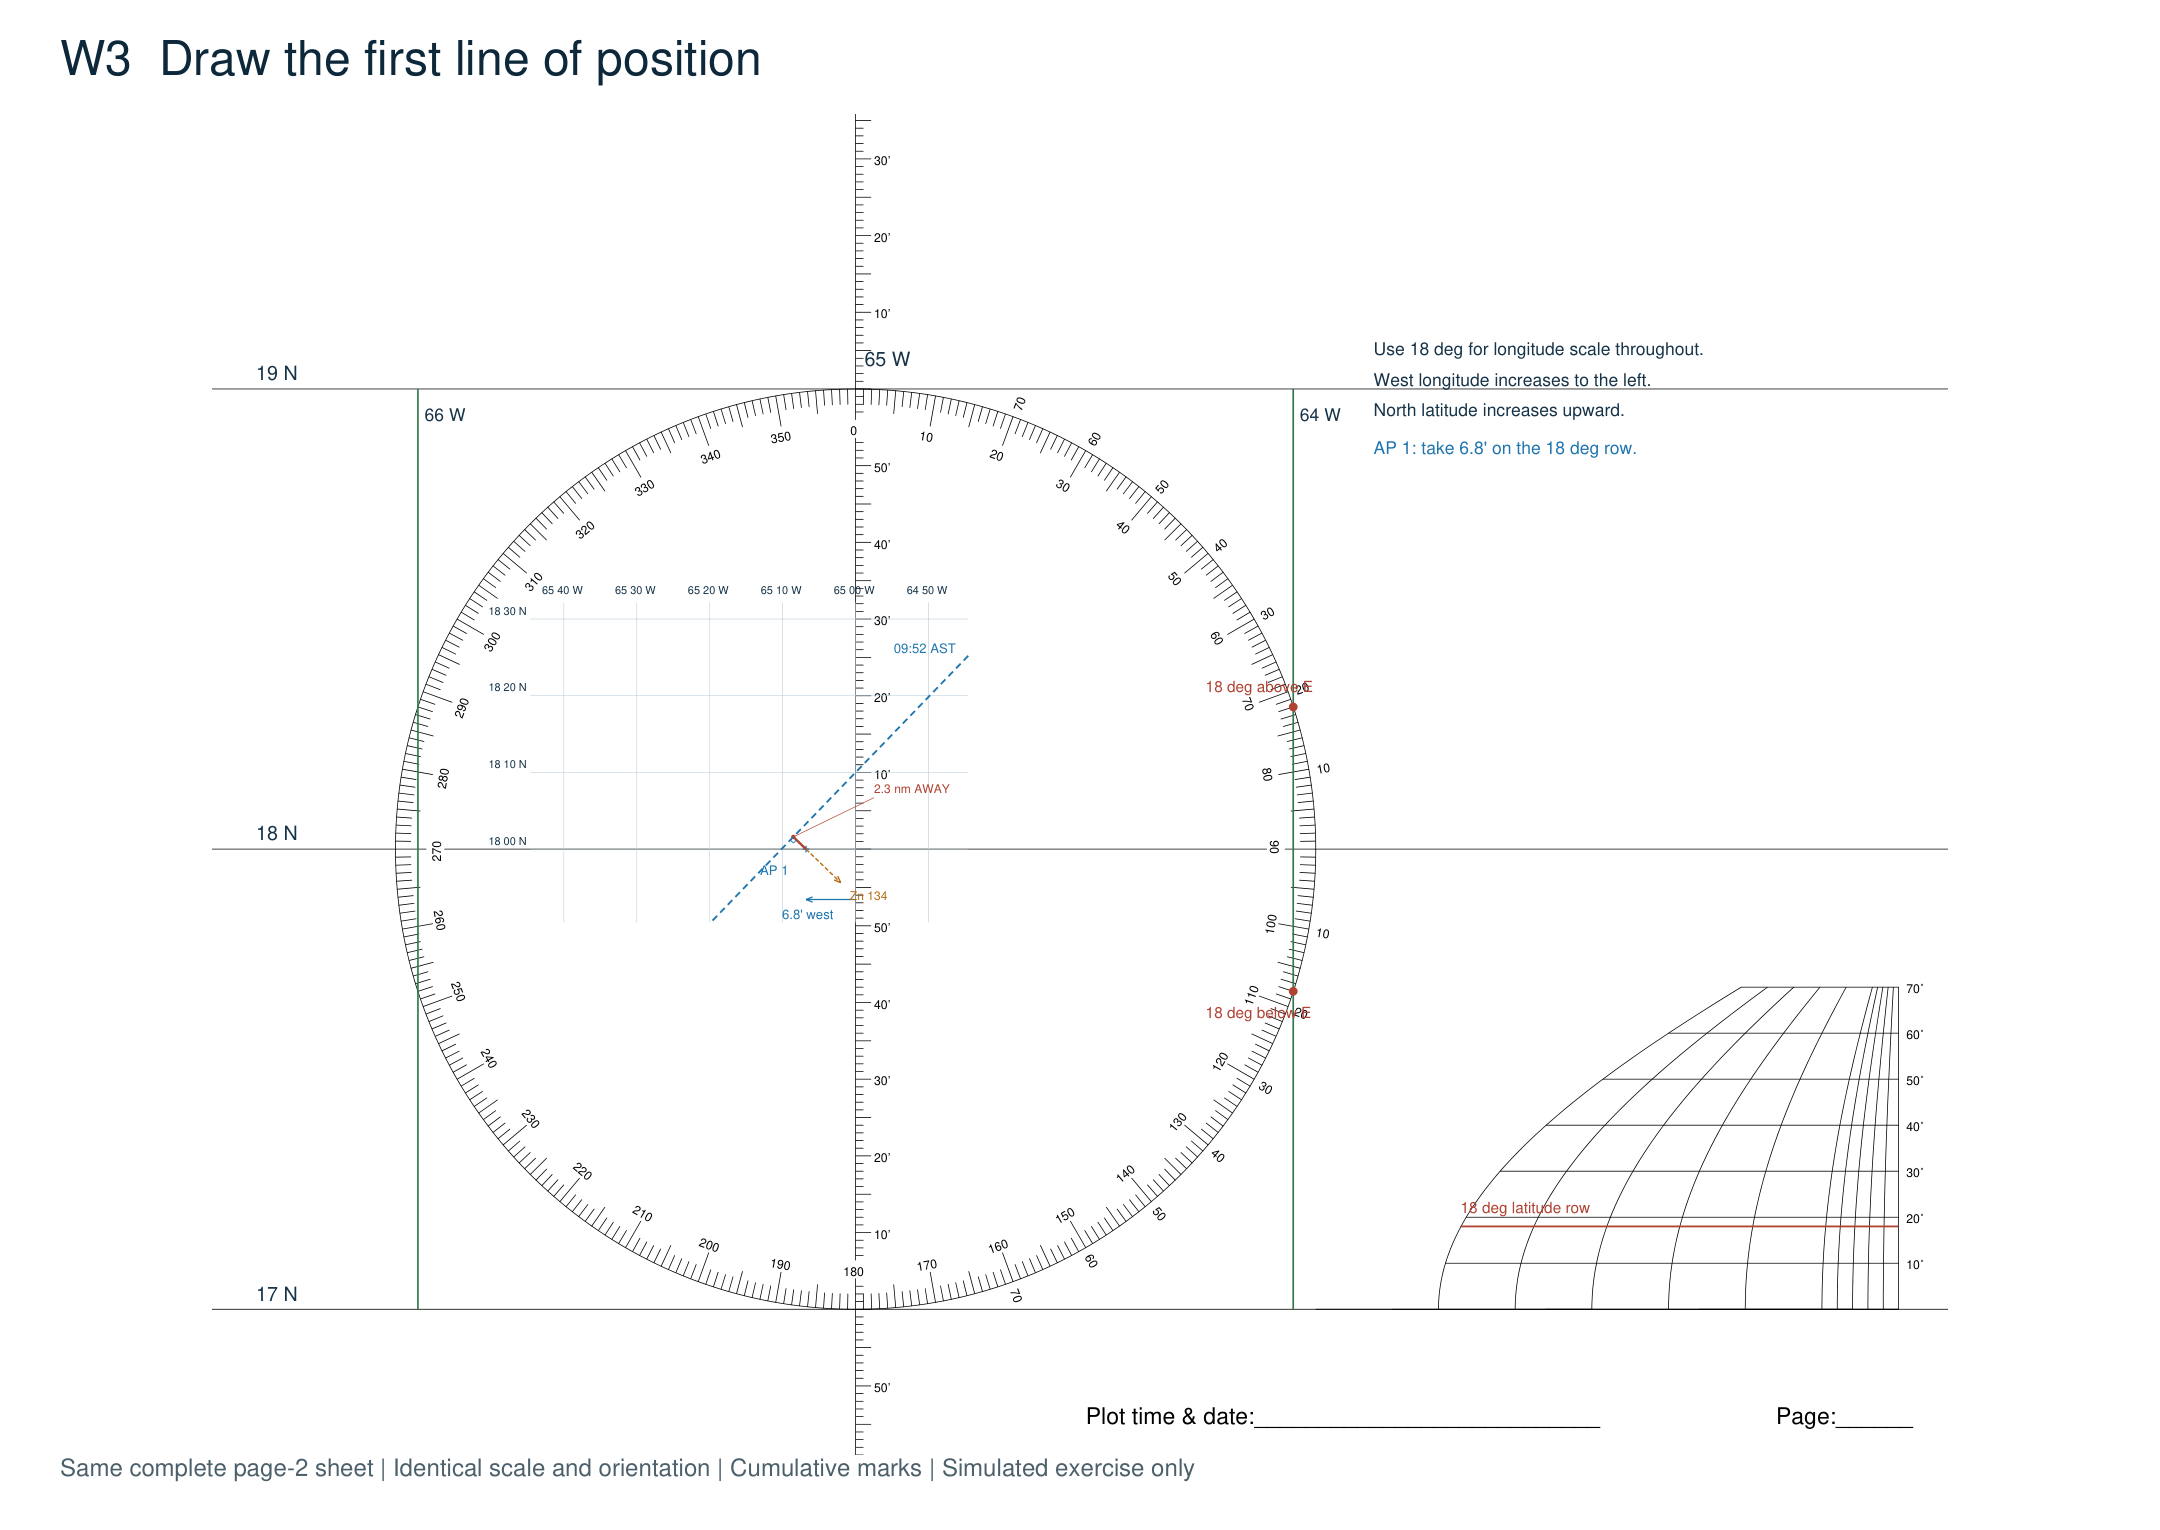
AP 1 is 18° N, 65°06.8′ W. Take 6.8′ of longitude from the conversion scale’s 18° row and step that span left from 65° W along the middle parallel. Mark a small cross. Do not use 6.8′ from the latitude scale: at 18° latitude, this longitude span is about 6.47 nautical miles. The light ten-minute guide lines simply help us read the same sheet. Plot the AP used in the reduction, not the boat’s DR position.
3. Draw the first line of position
Through AP 1, lay off the Sun’s azimuth, 134° true. Our intercept is 2.3 nm Away, so take 2.3′ from the latitude scale and mark that distance on the opposite bearing, 314° true. Through the intercept mark, draw a perpendicular to the azimuth: the LOP runs 044°/224° true. Label it 09:52 AST (13:52 UTC). The dashed blue line is the LOP; the short line toward the Sun is only our construction line.
Step 3 in detail
These are enlarged areas of the complete sheet on the preceding page. The left view shows the plotting area; the right view shows the original longitude conversion scale. No distances, angles or marks have been changed.
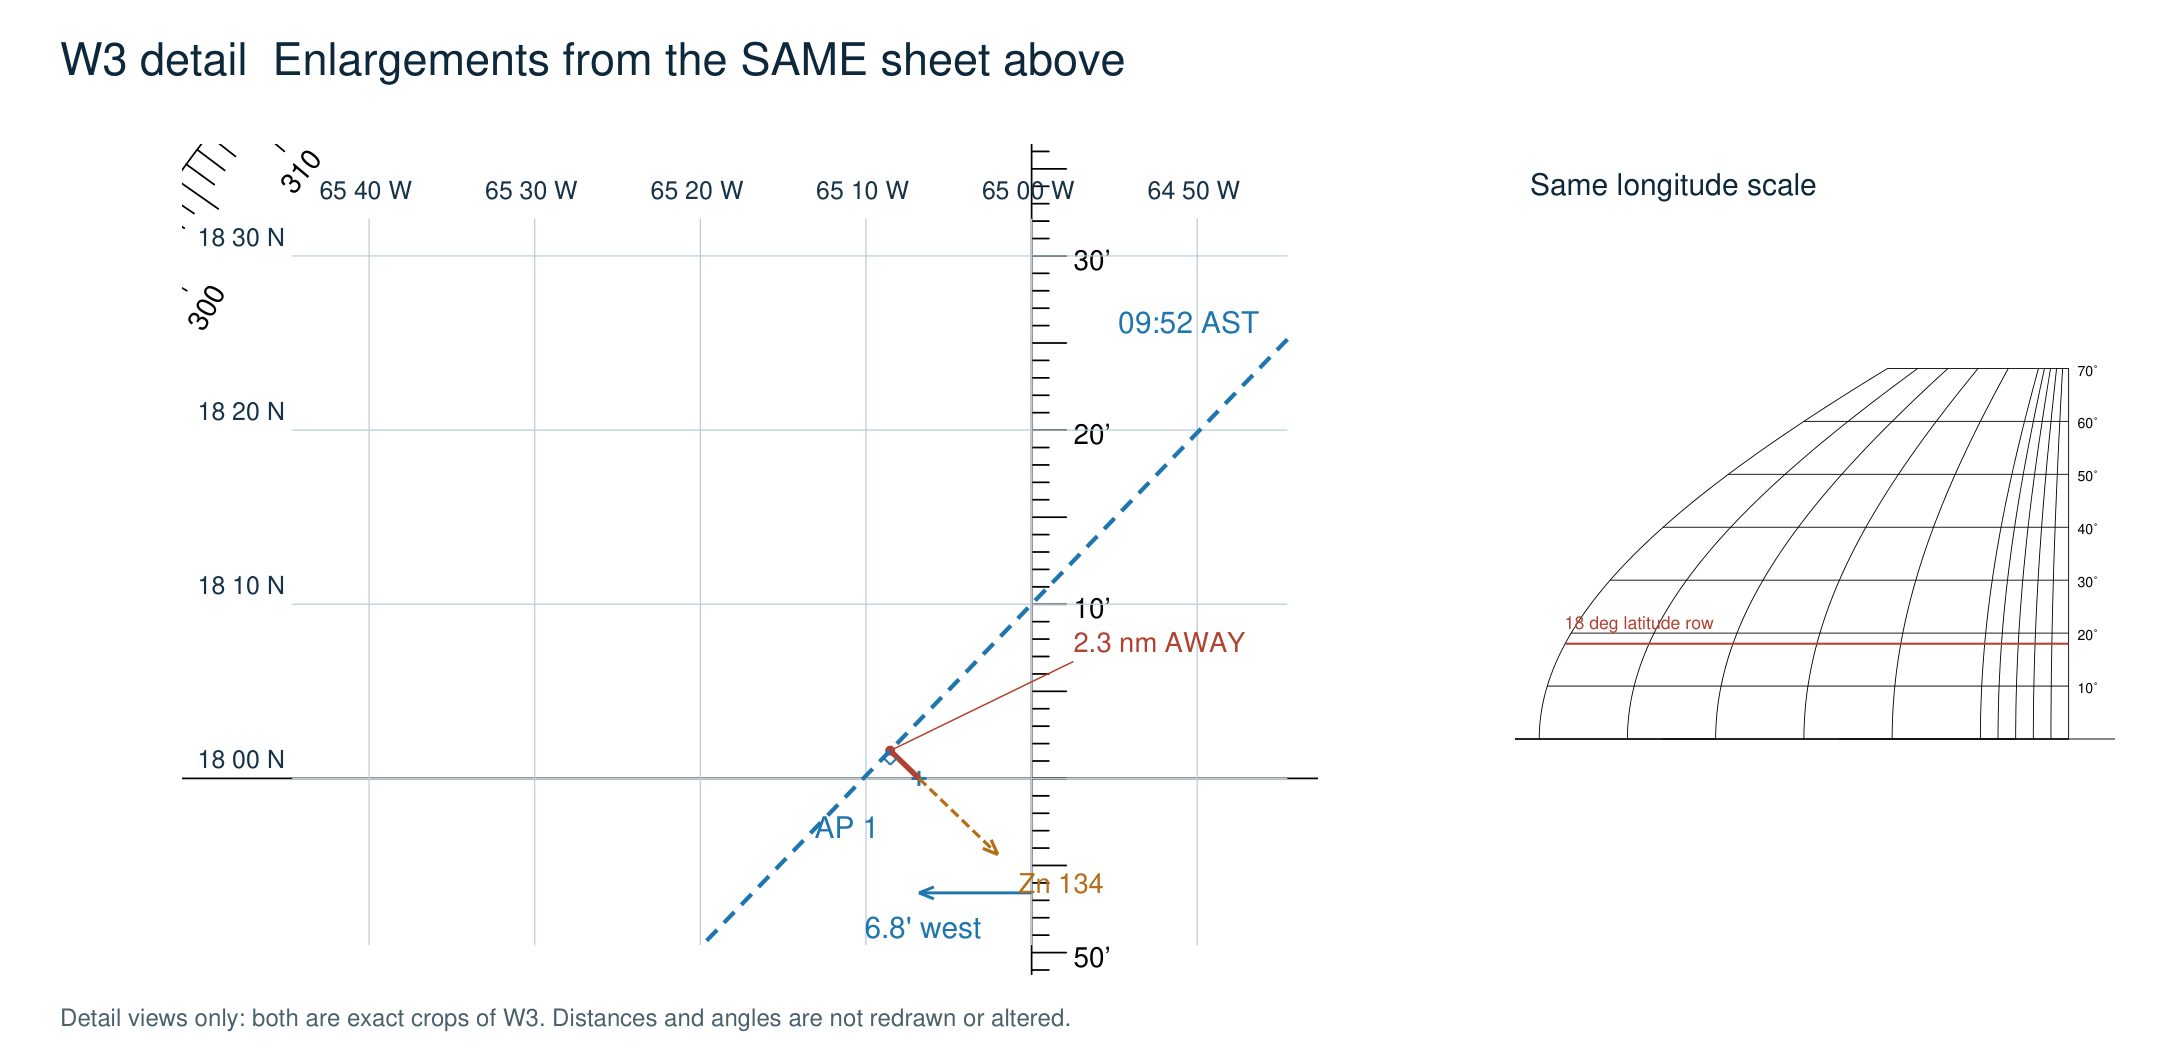
The short red segment is 2.3 nm Away from AP 1, opposite the Sun’s 134° bearing. The blue LOP passes through its outer end at a right angle. A small intercept is one reason a sharp pencil and a clear mark at the AP matter.
4. Add the second sight
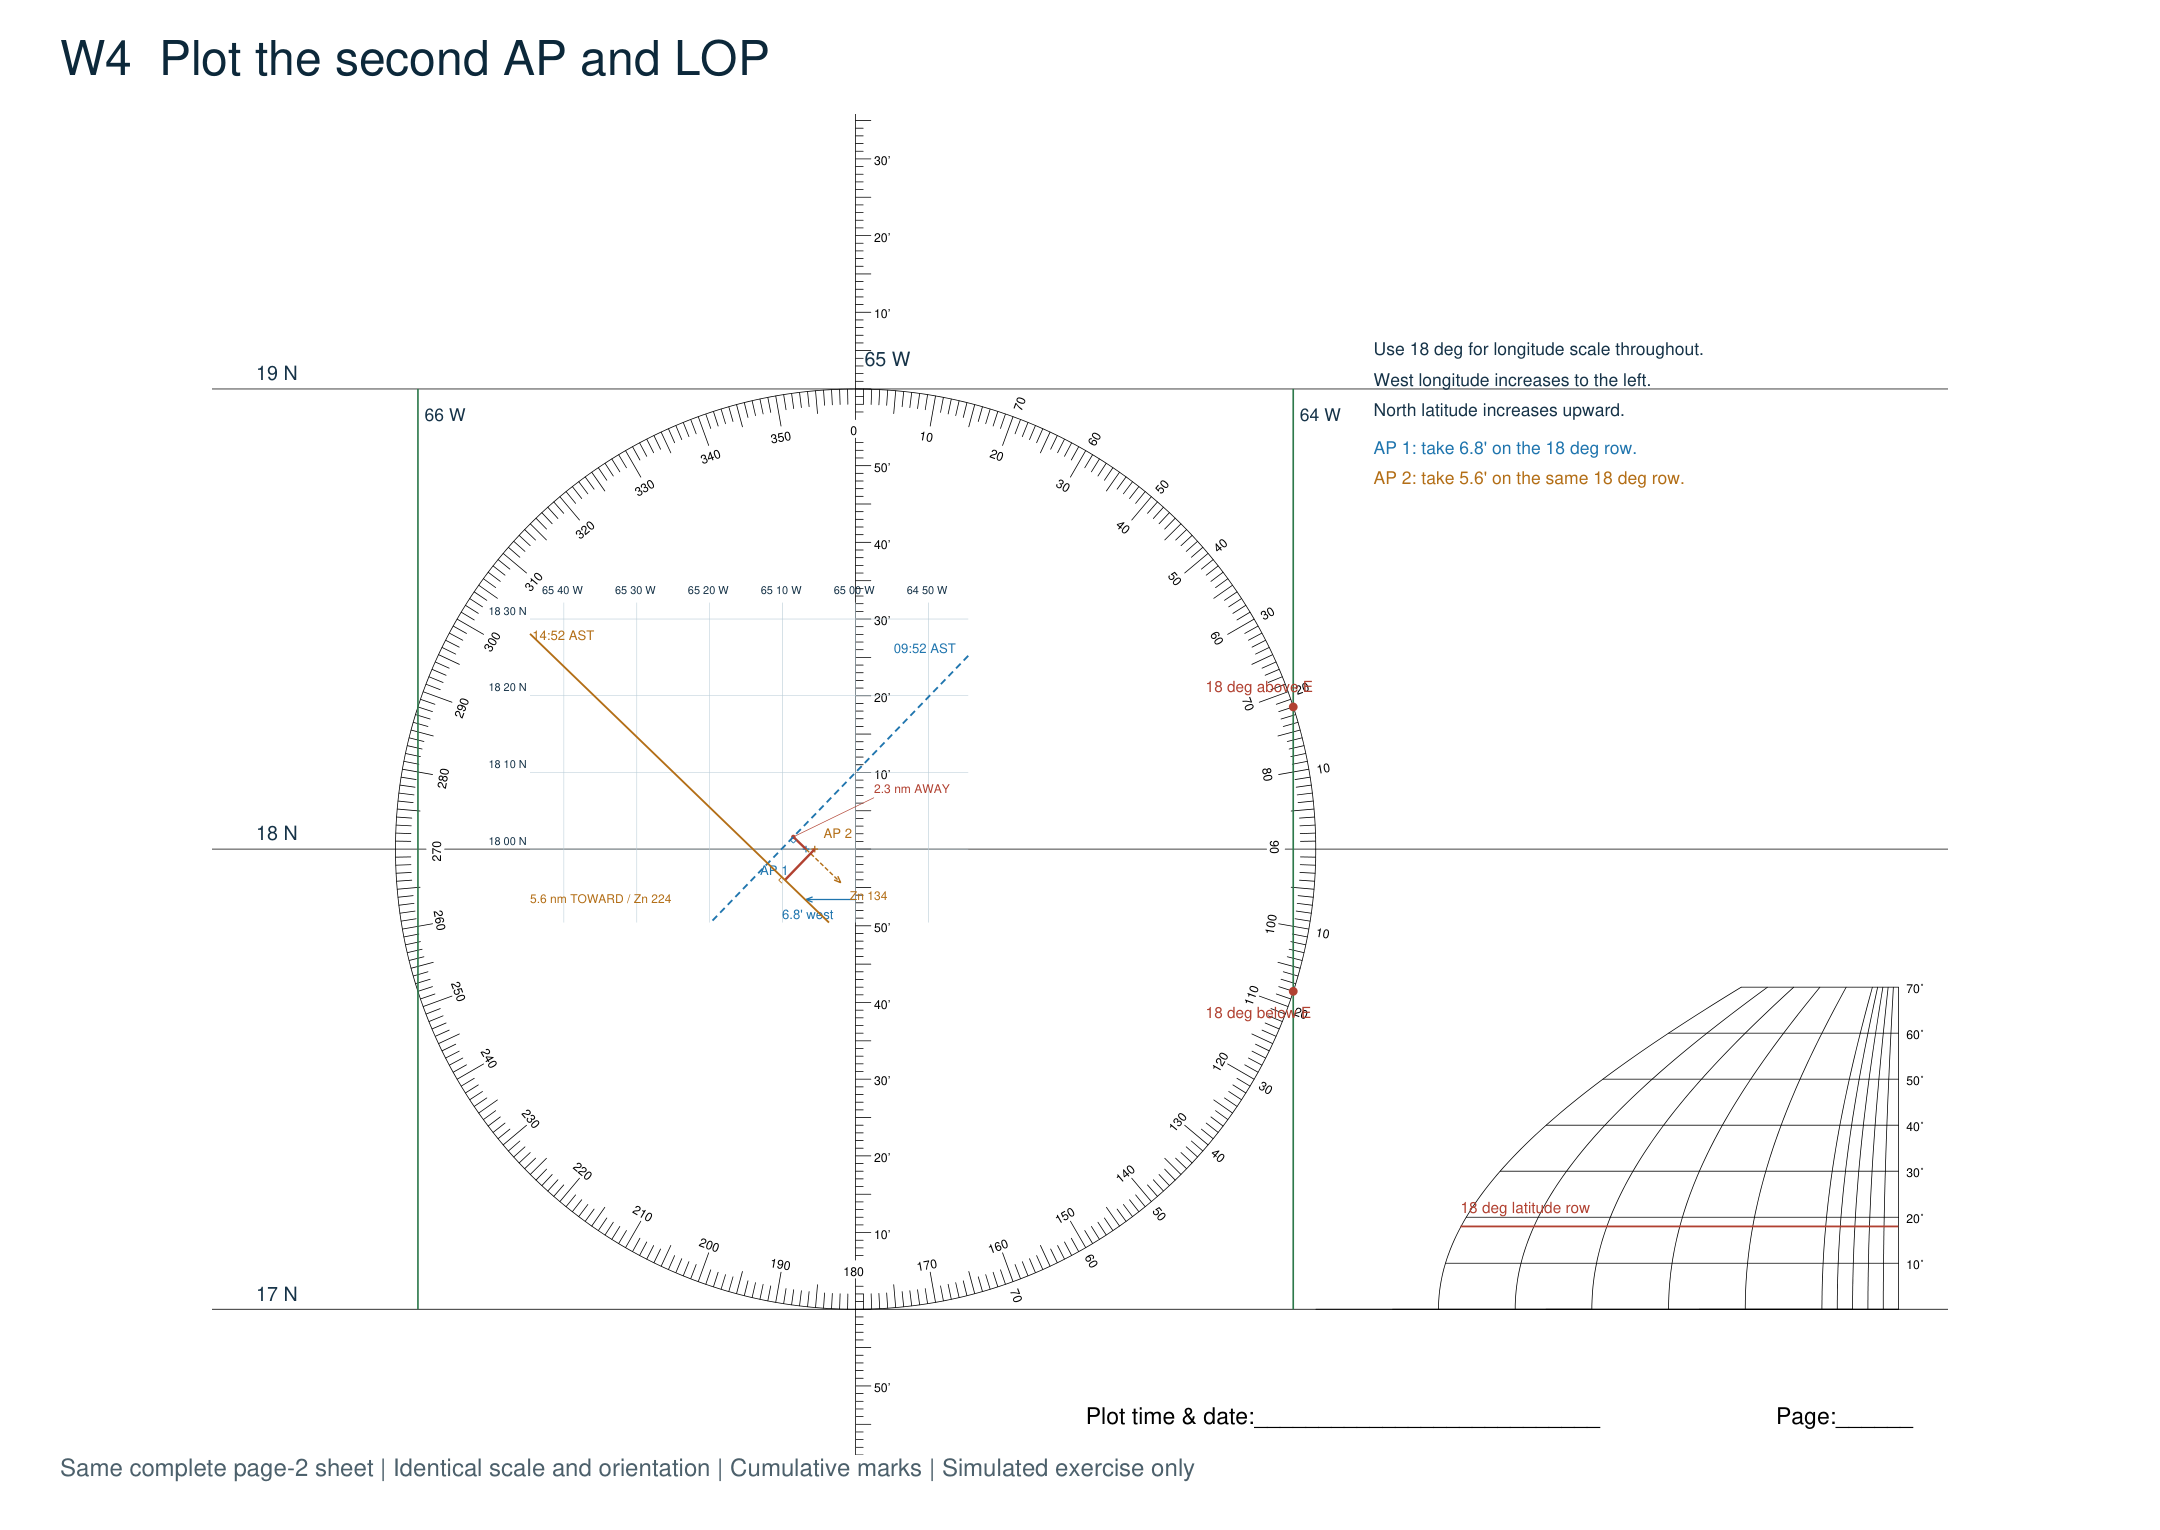
AP 2 is 18° N, 65°05.6′ W, only 1.2′ of longitude east of AP 1. Use the same 18° longitude scale to position it. Lay off 224° true, then measure 5.6′ on the latitude scale and mark that distance Toward the Sun, southwest of AP 2. Draw the perpendicular LOP on 134°/314° true and label it 14:52 AST (18:52 UTC). Do not call the crossing of these two original lines a fix: they describe different times.
5. Advance the first line
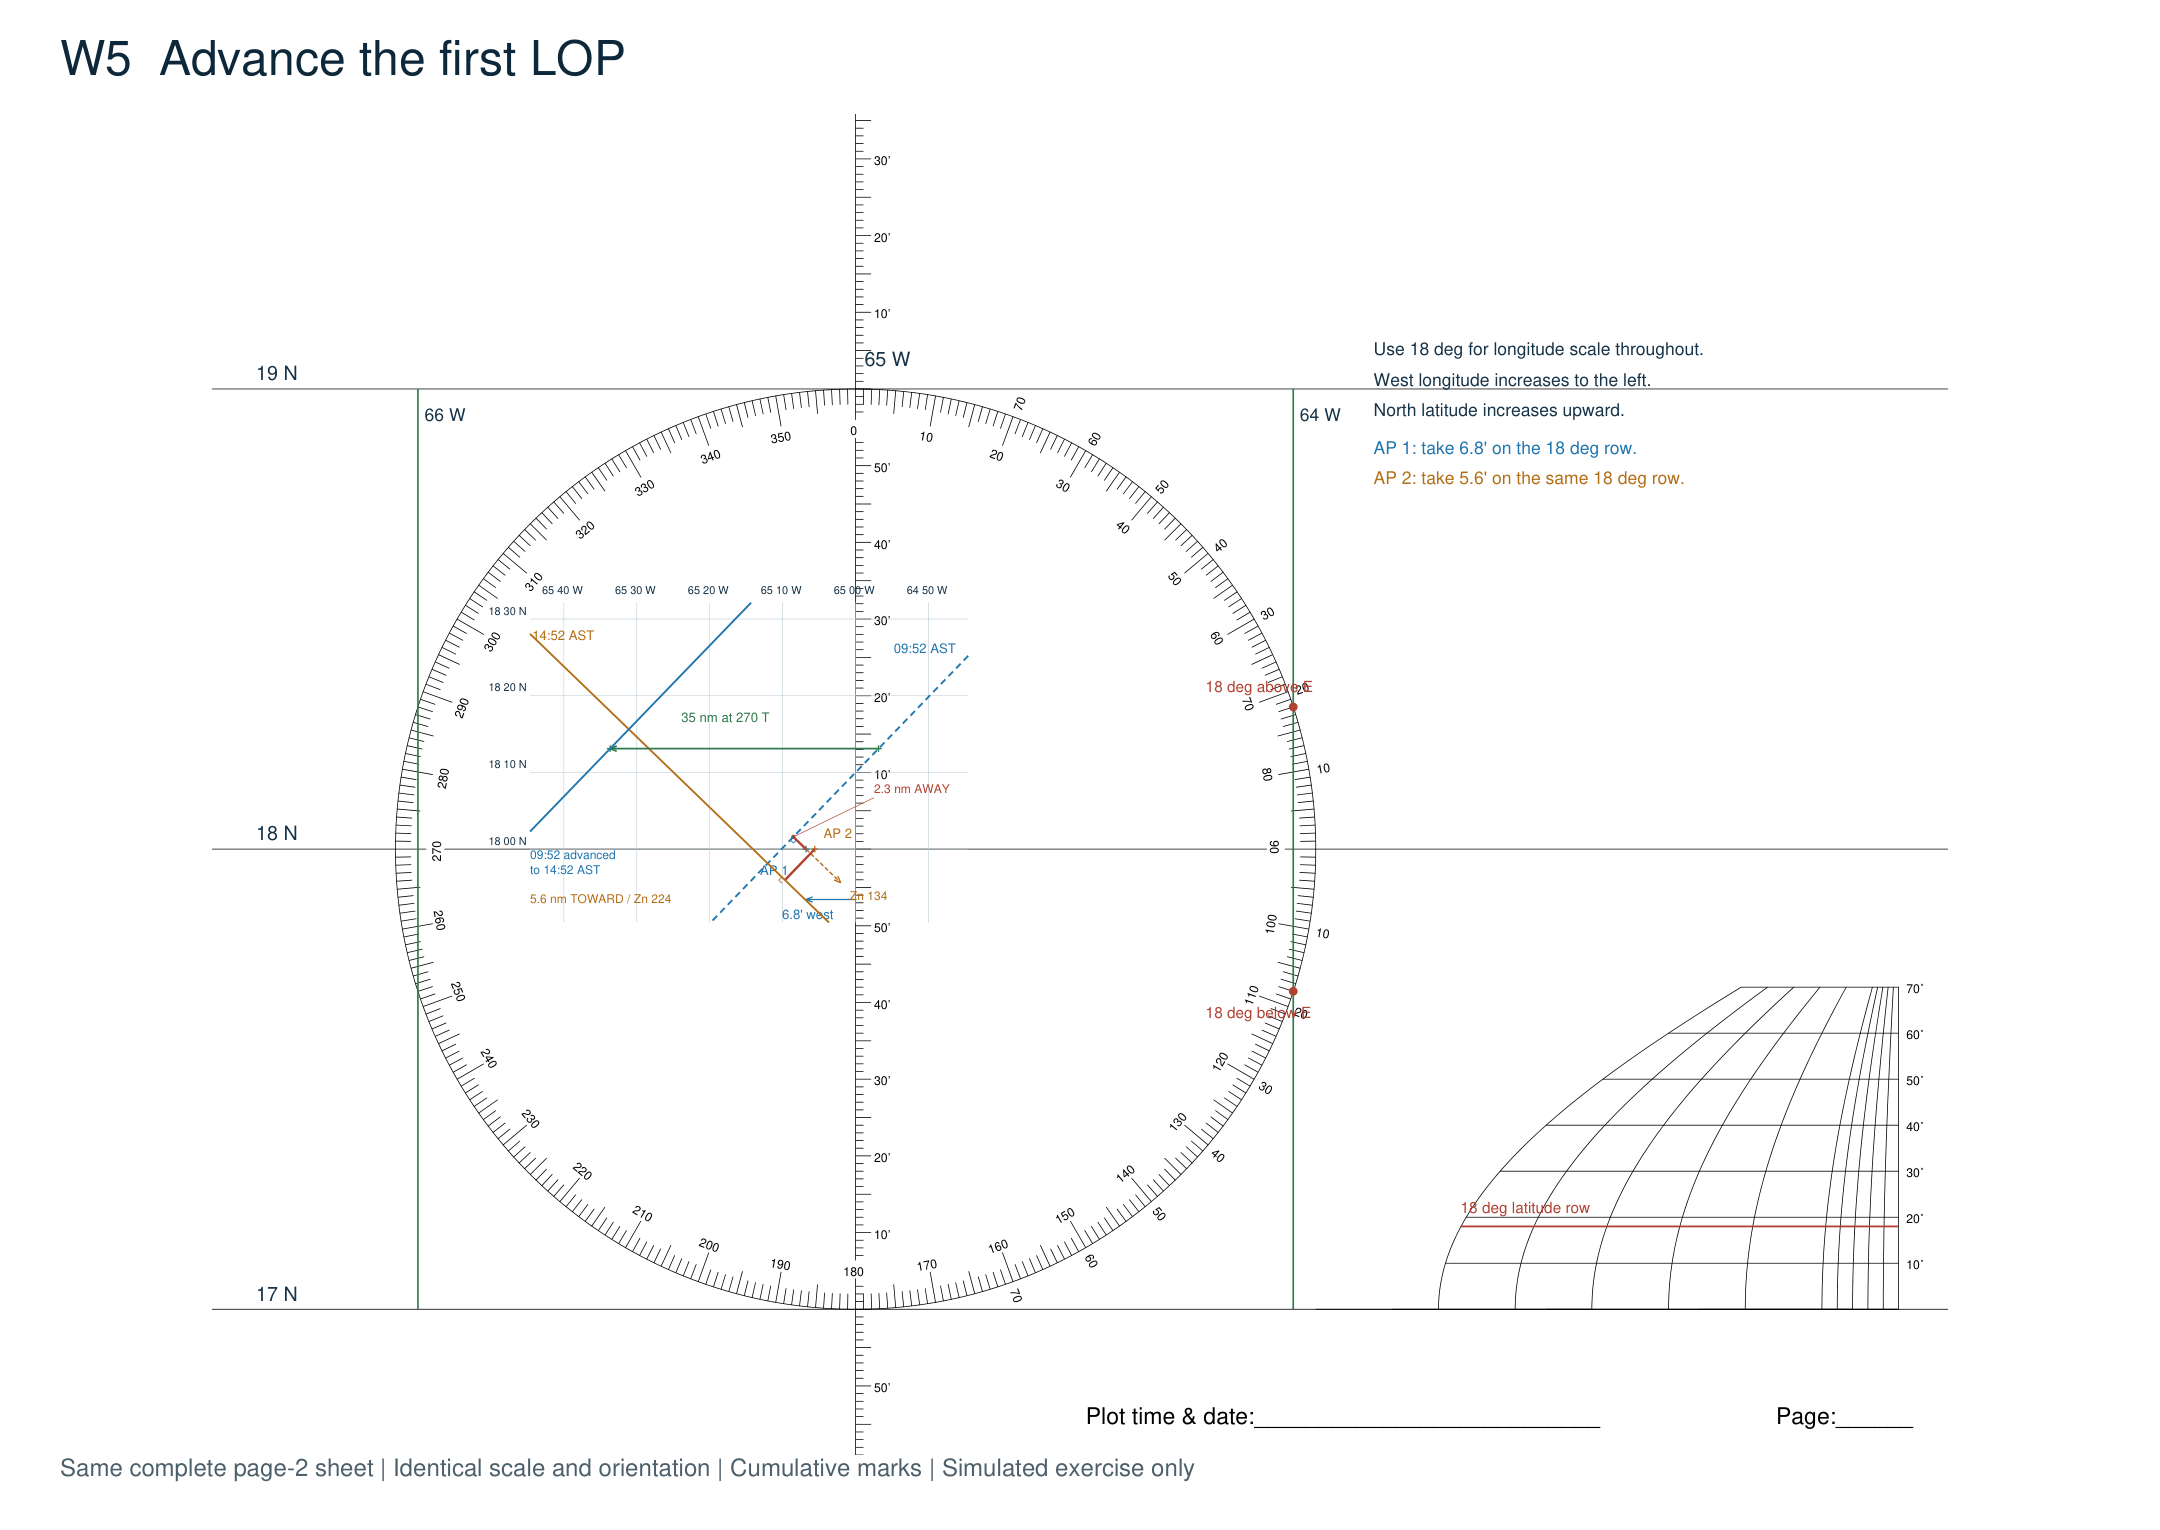
Choose any convenient point on the first LOP. AP 1 is not on that line, so do not use it as the transfer point. From your chosen point, measure the estimated run: 35′ on the latitude scale, due west on 270° true. Through the new point, draw a line parallel to the first LOP. We have translated the whole line without rotating it. Label the new solid blue line 09:52 advanced to 14:52 AST.
Step 5 in detail
These are enlarged areas of the complete sheet on the preceding page. The left view shows the plotting area; the right view shows the original longitude conversion scale. No distances, angles or marks have been changed.
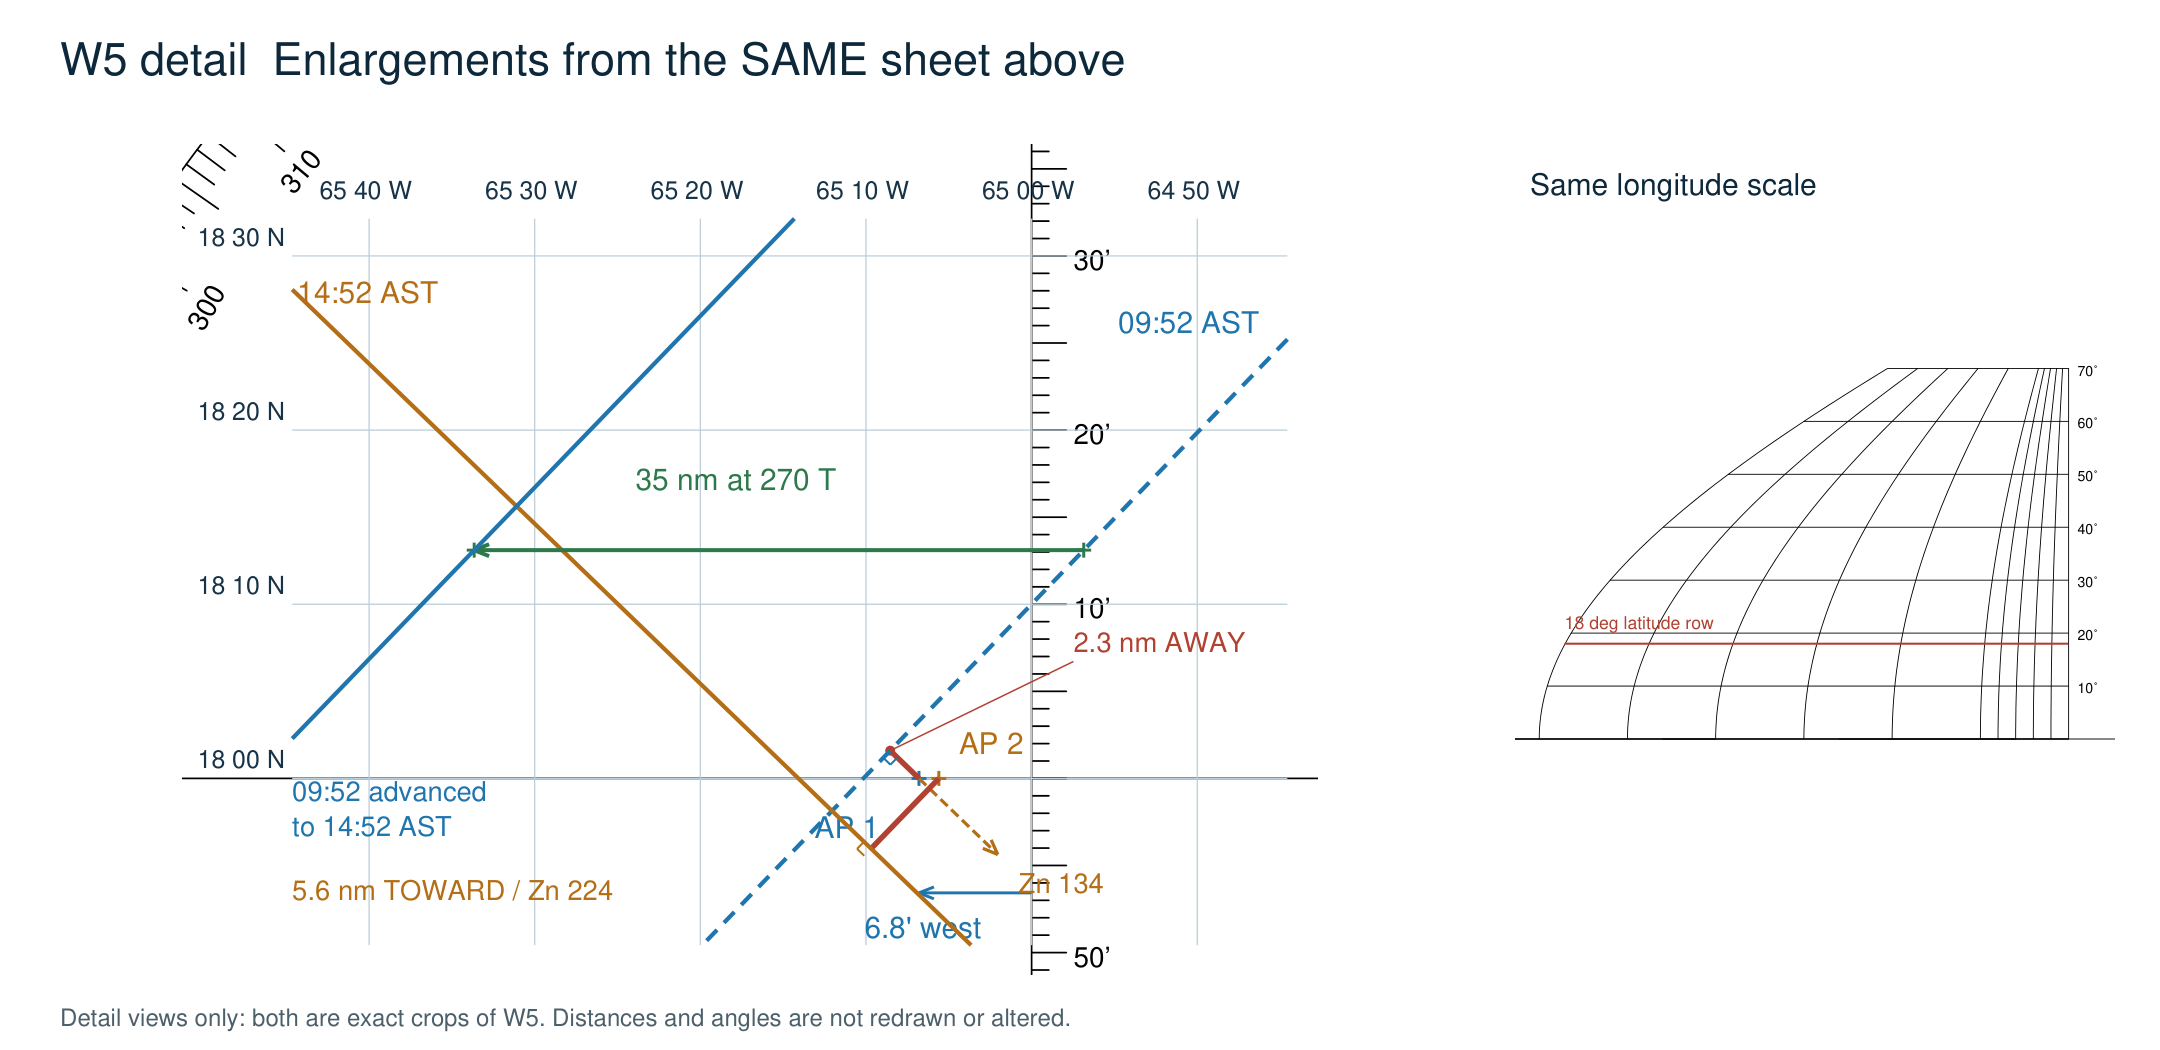
The two green marks identify corresponding points on the old and advanced lines. Their separation is the 35 nm run, not the intercept. The new line has exactly the same direction as the old one.
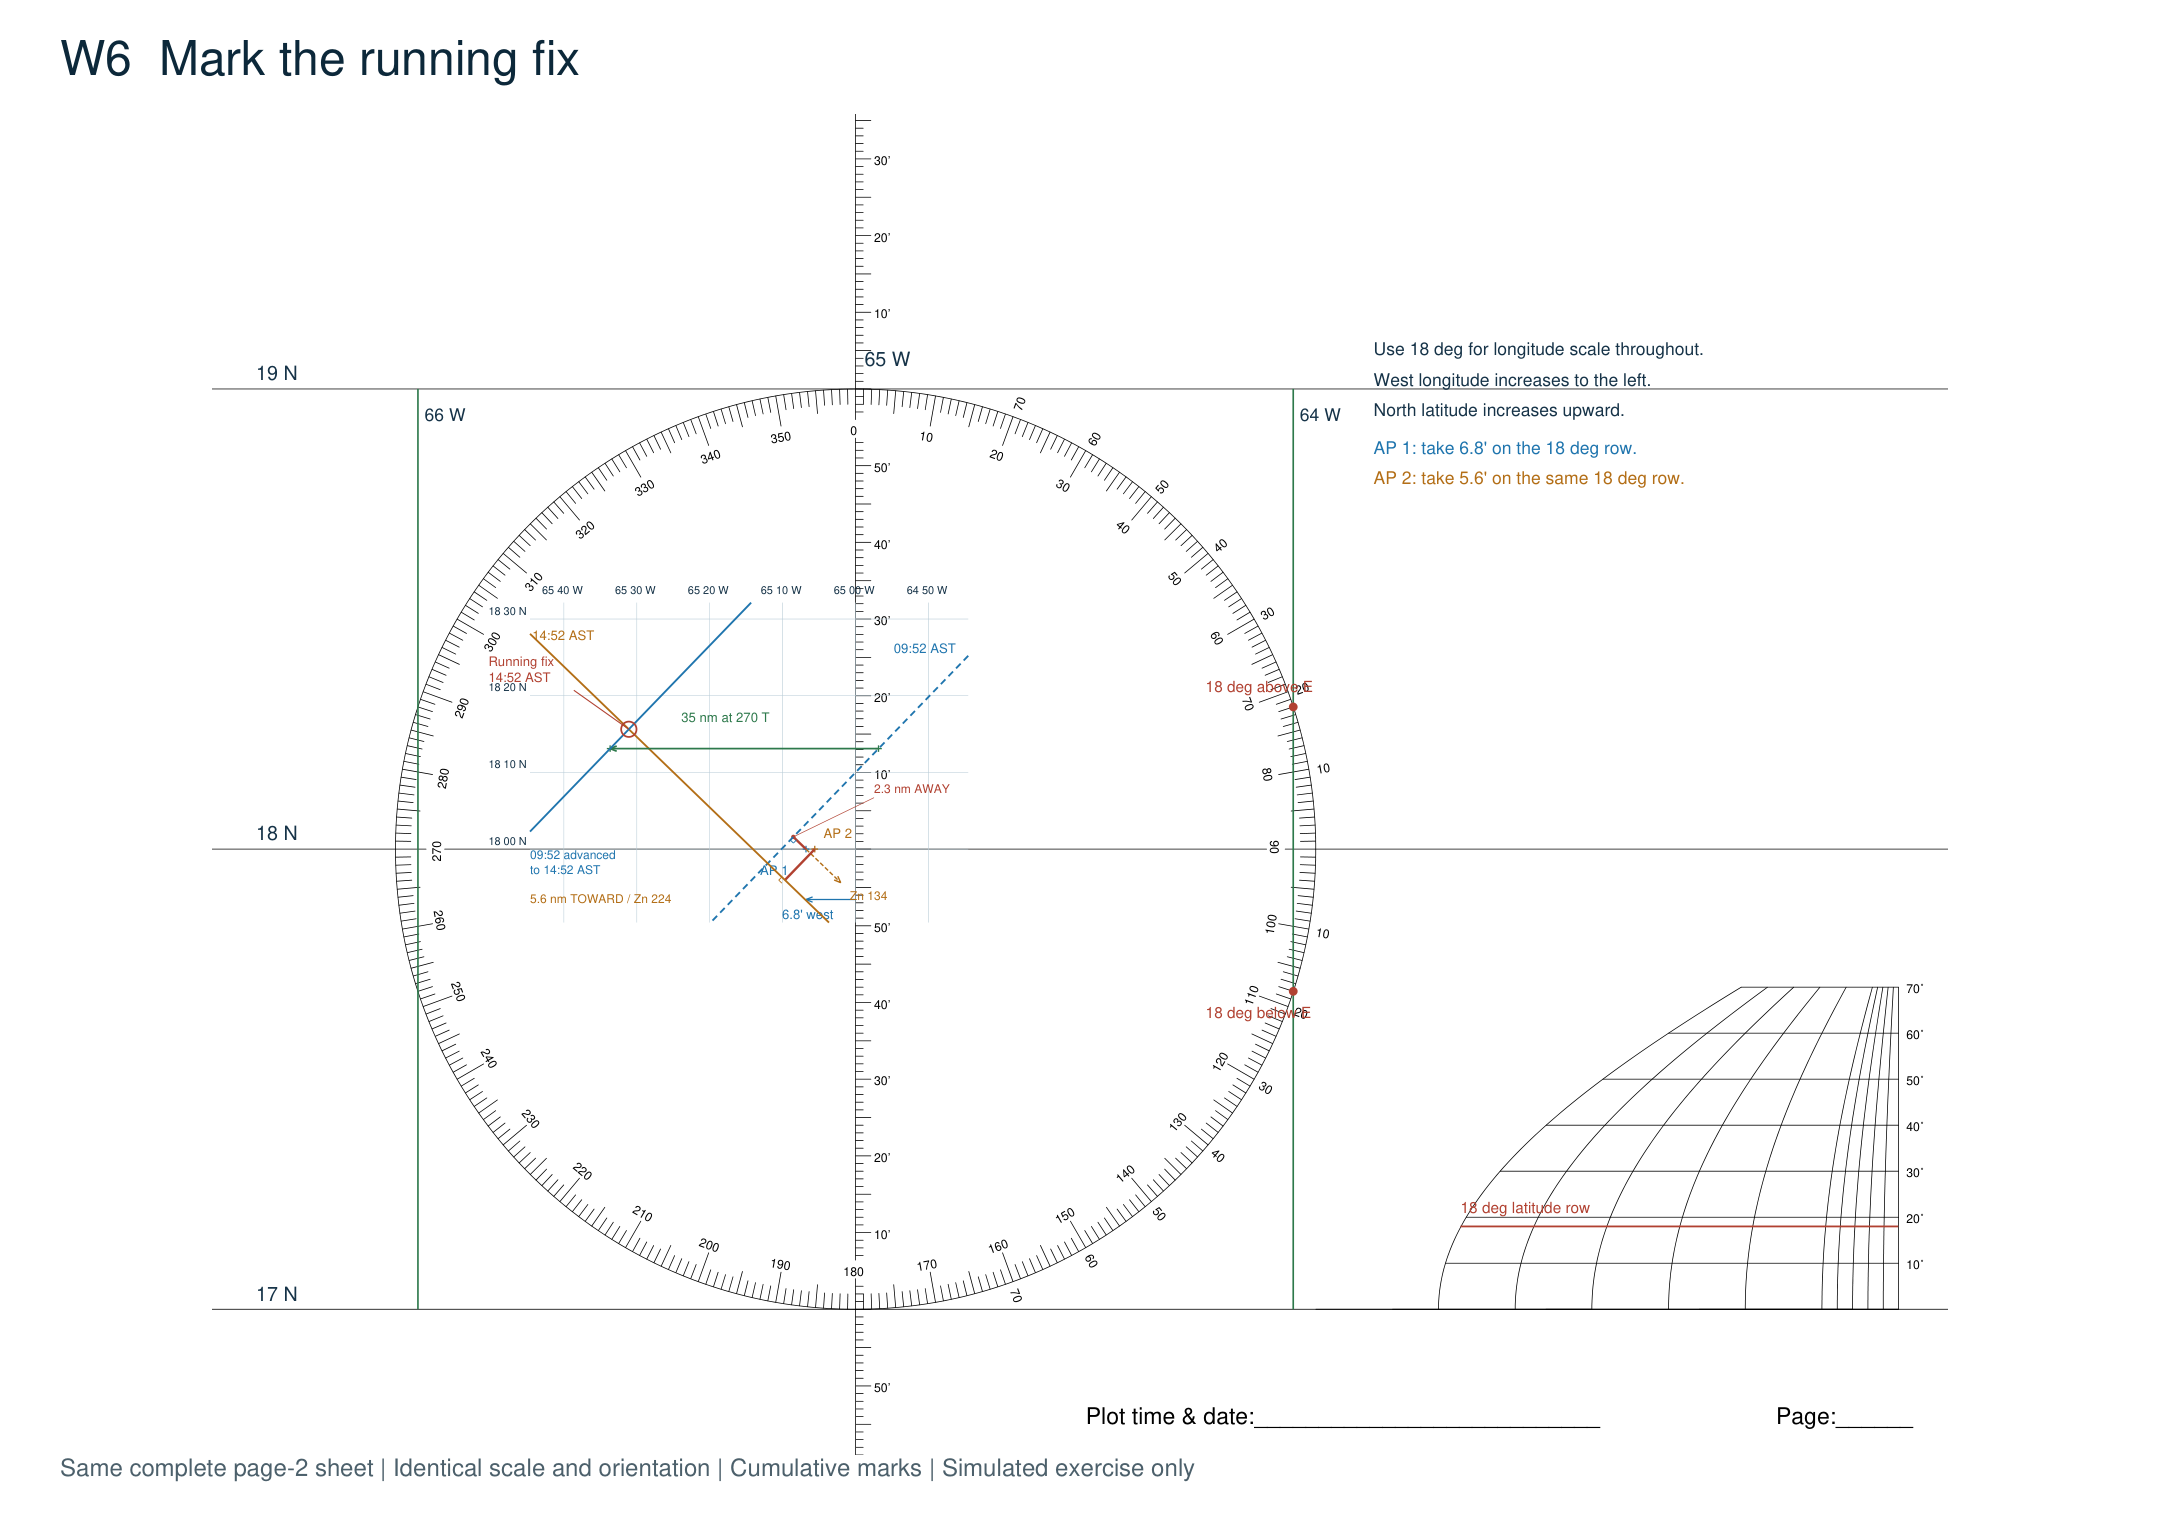
6. Mark the running fix
Circle the intersection of the advanced first LOP and the second LOP. This is our running fix at 14:52 AST, or 18:52 UTC. Both lines now refer to the second sight’s time. Keep the old dashed line visible so it is clear which crossing we used. No further run is needed to find our position at that time; a later position would require a further estimate of movement from this fix.
7. Read the coordinates
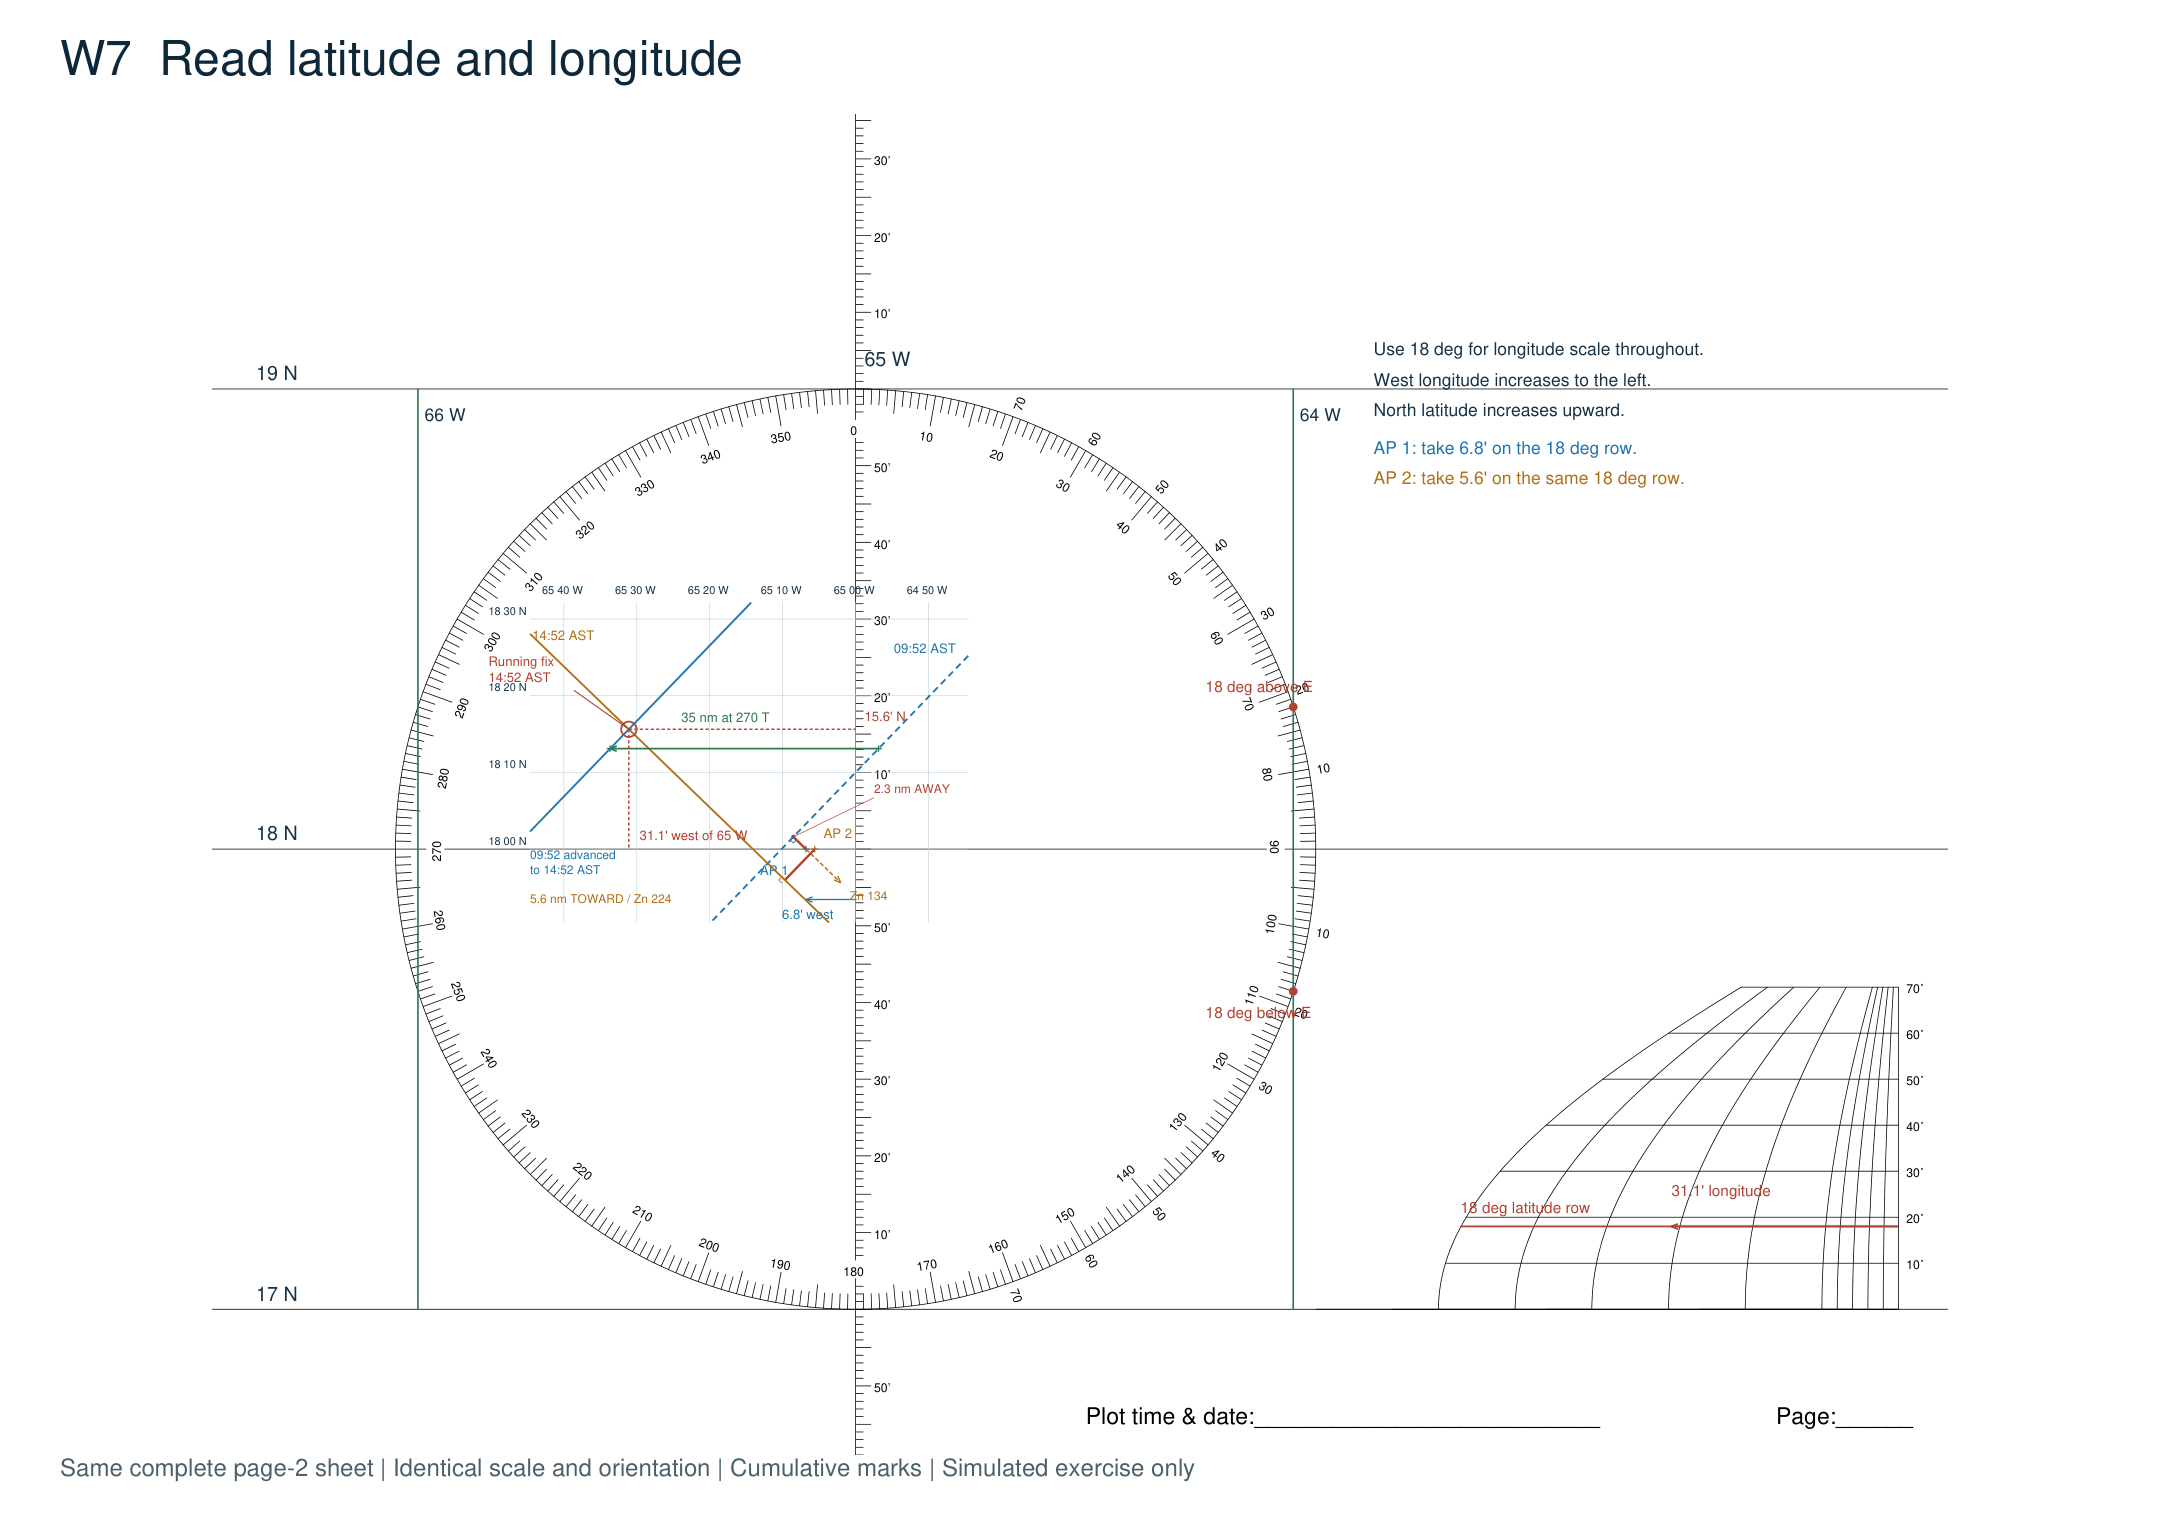
Transfer the fix’s north–south position to the latitude scale. It is about 15.6′ north of the 18° N parallel: 18°15.6′ N. Next take the horizontal span from the central 65° W meridian to the fix and read it on the 18° row of the longitude scale. It is about 31.1′ west: 65°31.1′ W. Our approximate running fix is therefore 18°15.6′ N, 65°31.1′ W at 14:52 AST on 10 January 2026.
Step 7 in detail
These are enlarged areas of the complete sheet on the preceding page. The left view shows the plotting area; the right view shows the original longitude conversion scale. No distances, angles or marks have been changed.
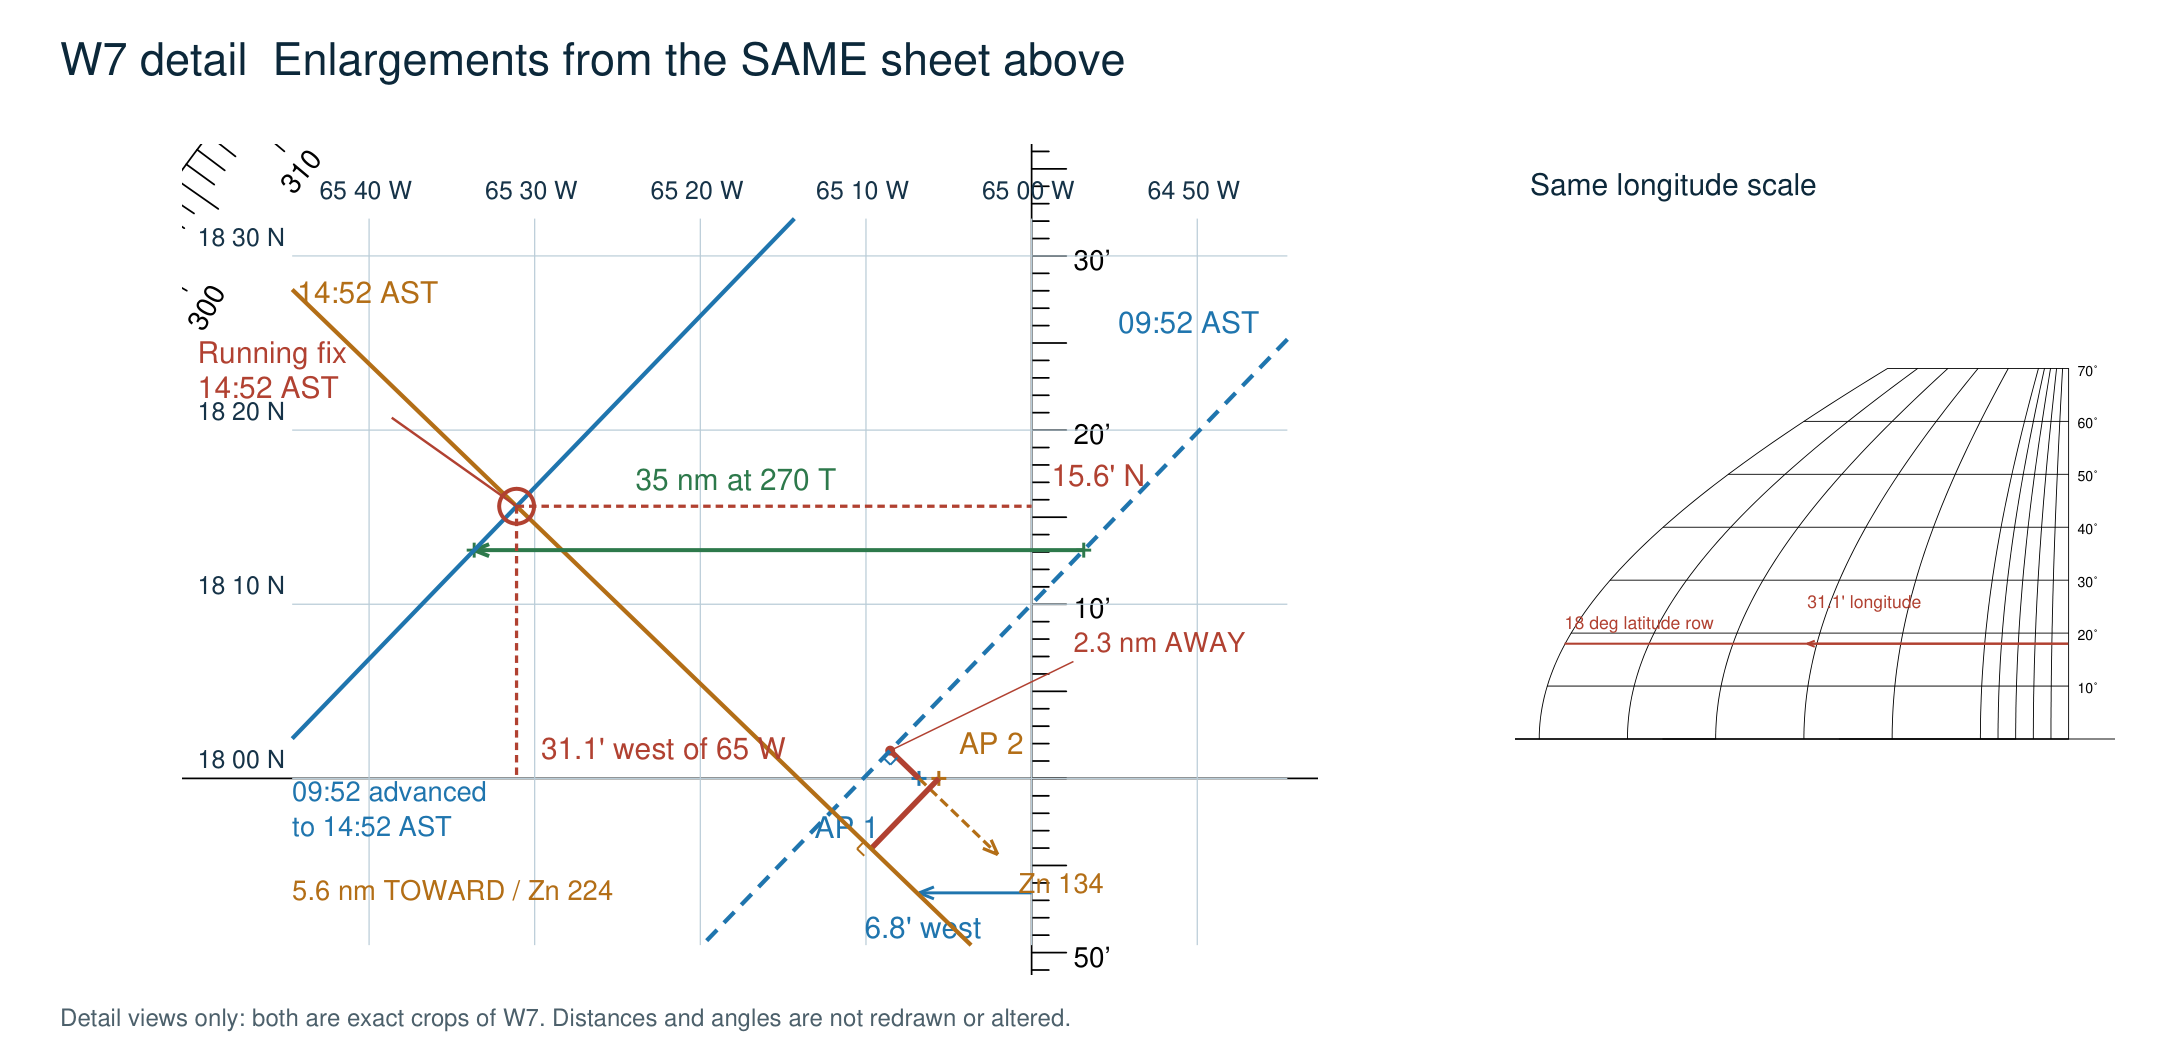
Use the latitude scale for north–south distance and all distances in nautical miles. Use the longitude conversion scale for the east–west coordinate. One minute of longitude at this latitude is shorter than one nautical mile.
What the fix tells us
We now have a position we can mark on a navigation chart, along with the time it applies to. That is the useful result of all the bookkeeping in Part 2. It is still an estimate, and the neat crossing of two pencil lines should not make it look more certain than it is.
A running fix inherits errors from both sights and from our estimate of the boat’s movement. Current, leeway, steering and speed changes can move the advanced line. Timing, horizon conditions, sextant technique and table rounding affect the original lines. A poor crossing angle makes the position less certain; this example’s nearly right-angle crossing is favorable.
Our plotted result is roughly 1 nm from the simulated DR endpoint. We have not moved the lines to force them through that endpoint. The whole-minute altitude tables, rounded azimuths and local-plane plotting approximation limit the precision of this exercise. More decimal places would not make the fix more trustworthy.
Before trusting the plot, check the things that are easy to reverse: west versus east longitude, Toward versus Away, true versus magnetic bearings, and which line has been advanced. Check that both LOPs are perpendicular to their azimuths and that the advanced line remains parallel to the original. Do not treat two lines from different times as though the boat stood still between them.
For practice, work from a known position and compare the result. Repetition will tell you more about the accuracy of your sights than one unusually good crossing. The plotting sheet itself shows no land, depths or hazards; use an appropriate chart before making any navigation decision.
Next in the series: Part 4: High noon, low math (latitude by noon sight)